How to Add and Remove User Roles
Last updated on July 30, 2021.
Last Reviewed and Approved on PENDING REVIEW
Intended Audience
This document is intended for use by the LSI or developer.
Introduction
The Rapid Provisioning System (RPS) uses a role-based authorization approach called Role-Based Access Control (RBAC) to restrict system access only to authorized users. The way you control access to resources using RPS RBAC is to assign users to roles. This is a key concept to understand—it is how permissions are enforced.
A role assignment consists of two primary elements: Users and Roles. The user is a member of a role. A role is what has the security right assigned to it. The first layer of security is to ensure only people who require access to RPS have user accounts. This article will provide the how-to instructions on adding or removing a role from a user in RPS.
Assumptions
You have read the Introduction to RBAC article and have a basic understanding of Role-Based Access Control.
You have access to the RPS Graphic User Interface (GUI or UI).
You are assigned to the appropriate role to make the changes you intend to make.
RBAC Fundamentals
RBAC Terms and Definitions
| RBAC Term | Definition |
|---|---|
| Role-Based Access Control (RBAC) | An authorization system that provides fine-grained access management of RPS resources. |
| Role | A collection of permissions. |
| User | A logical representation of a person or persona acting as a consumer (of the application). Most users are objects found in the Active Directory; however, some personas—such as service accounts—are treated as users but are not found in the Active Directory. |
| Local User | The Local User is stored on the computer's local hard disk. Changes made to the Local User profile are specific to the user and to the computer on which the changes are made. |
RBAC Concepts
- RPS uses Windows to perform its authentication, but has internal roles for authorization.
- To add users to RPS, the user must be a local or domain account and must be accessible via the system running RPS.
- When a user is added, they will not have any rights or privileges until they are assigned to a role.
- If a local or domain account is suspended or deleted, that account will be unable to access RPS.
RPS Roles
The following pre-defined roles are available upon installation of RPS:
| Role Name | Description |
|---|---|
| AD Admin | Allows full access to Active Directory items. |
| Audit Entry Viewer | Can view audit entries. |
| Certificate Admin | Full access to certificates. |
| Certificate Read | Can read certificates. |
| Credential Admin | full access to credential. |
| Credential Read | Allows read access to credential. |
| DSC Admin | Full DSC access. |
| DSC Partial Assigner | Can assign DSC partials. |
| Full Read | Full read can read all data in RPS. |
| Network Admin | Allows full access to network items. |
| Patch Admin | Patch admin has full control over patching system. |
| Patch Stream Approver | Can approve patch streams. |
| Patch Stream Creator | Can create patch streams. |
| Patch Stream Scheduler | Can scheduler patch streams. |
| Patch Viewer | Can view all patch data. |
| RBAC Admin | Full RBAC control. |
| RPS Admin | Full control over RPS, except for Security. |
| Super Admin | Super admin has full control over RPS. |
| Sync and CDN Admin | Can Administer Sync and CDN. |
| System Admin | Allows full access to Virtual machines and related items. |
How to Add a User to a Role in RPS in the Web User Interface
In RPS you can add single users or multiple users at the same time directly to roles.
To add a user to a role assignment:
From any page in RPS, select Admin in the navigation bar.
In the dropdown menu, select Roles.
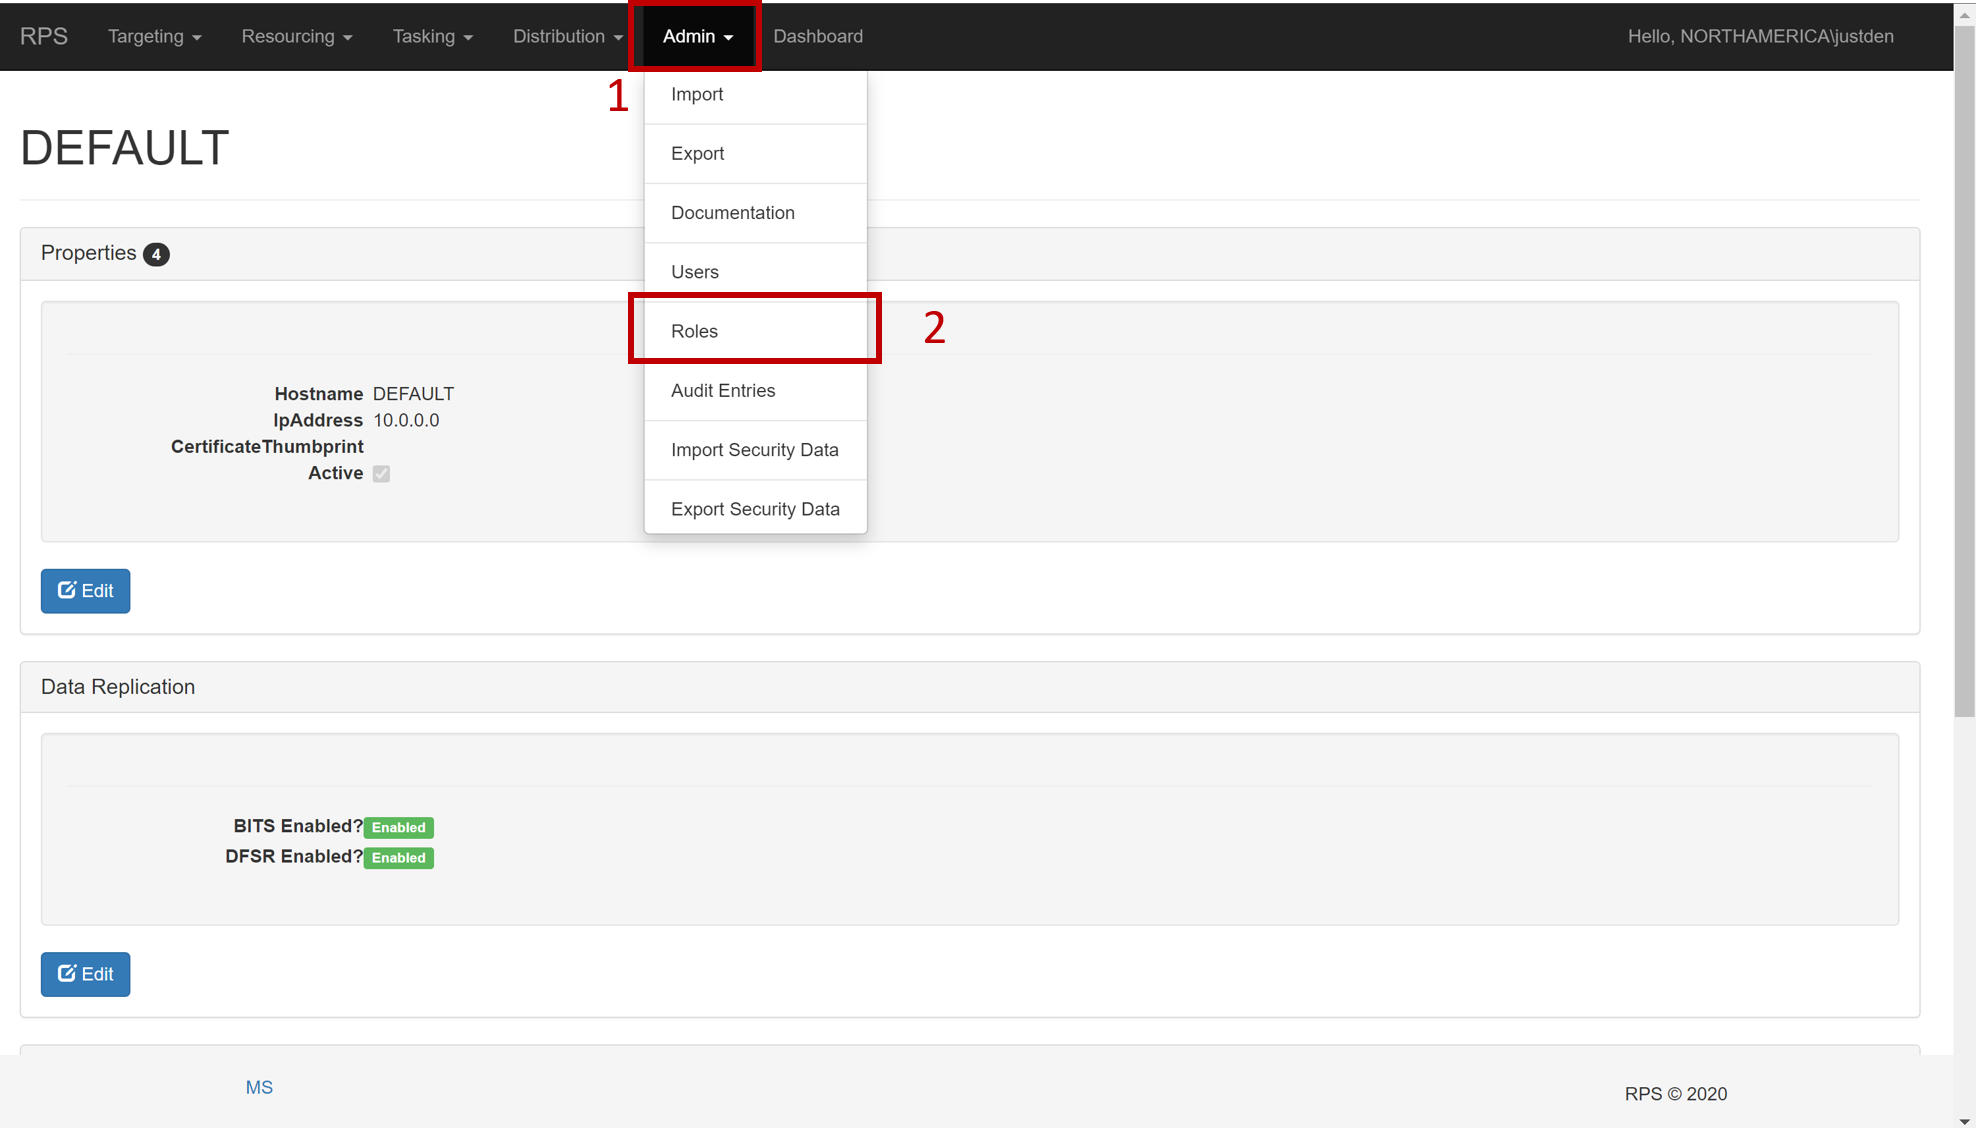
Figure 1: Select Admin and then Roles in the dropdown.
Click on the [Role] you would like to add a user to.
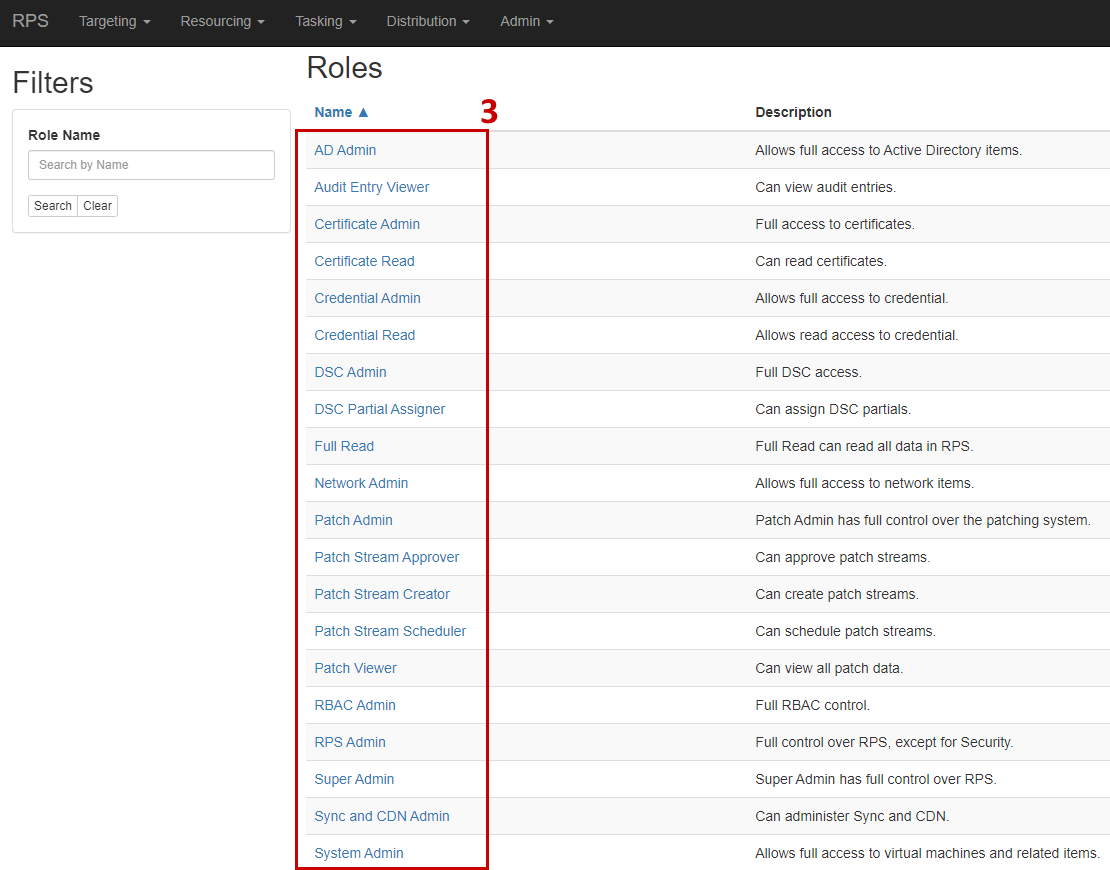
Figure 2: Select a role to add the user to.
Scroll to the bottom of the page. In the 'Members' section, click Edit.
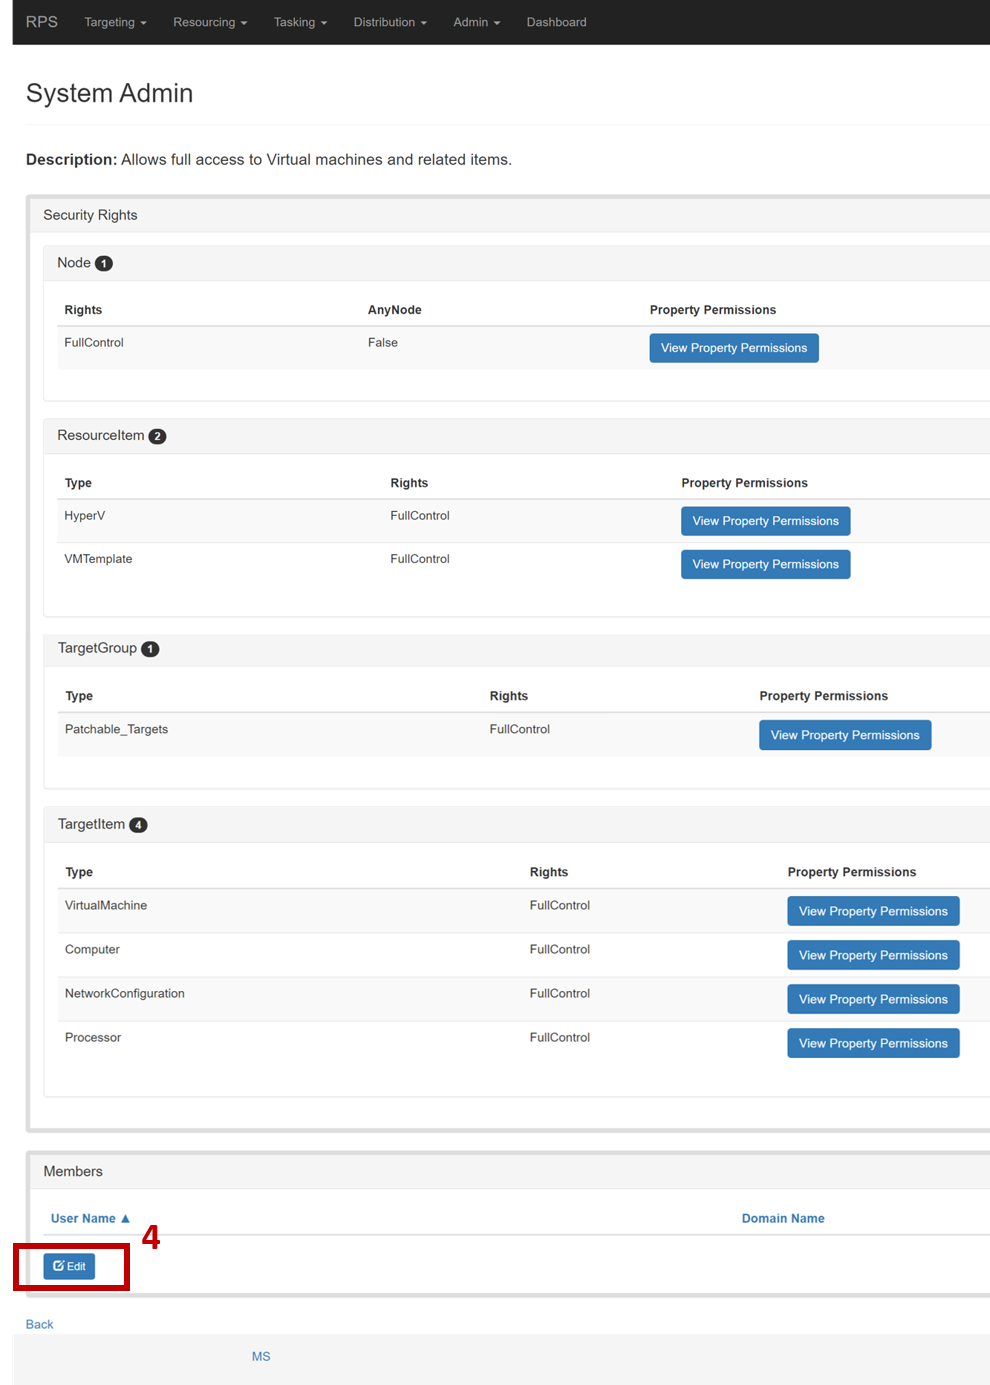
Figure 3: In the 'Members' section, click Edit.
Select the [User] from the 'Available Users' section you would like to add to the role.
Click the double right arrow >>.
![Figure 4: Select the **[User]** from the 'Available Users' section to add to the role and click the **double right arrow >>**.](../../../../../Images/v4.0.0/RPS/Operations/RBAC/HowToAddAndRemoveUserRoles/RBAC_Roles4.png)
Figure 4: Select the [User] from the 'Available Users' section to add to the role and click the double right arrow >>.
Note
To add multiple users, repeat steps 5 and 6.
Click Assign.
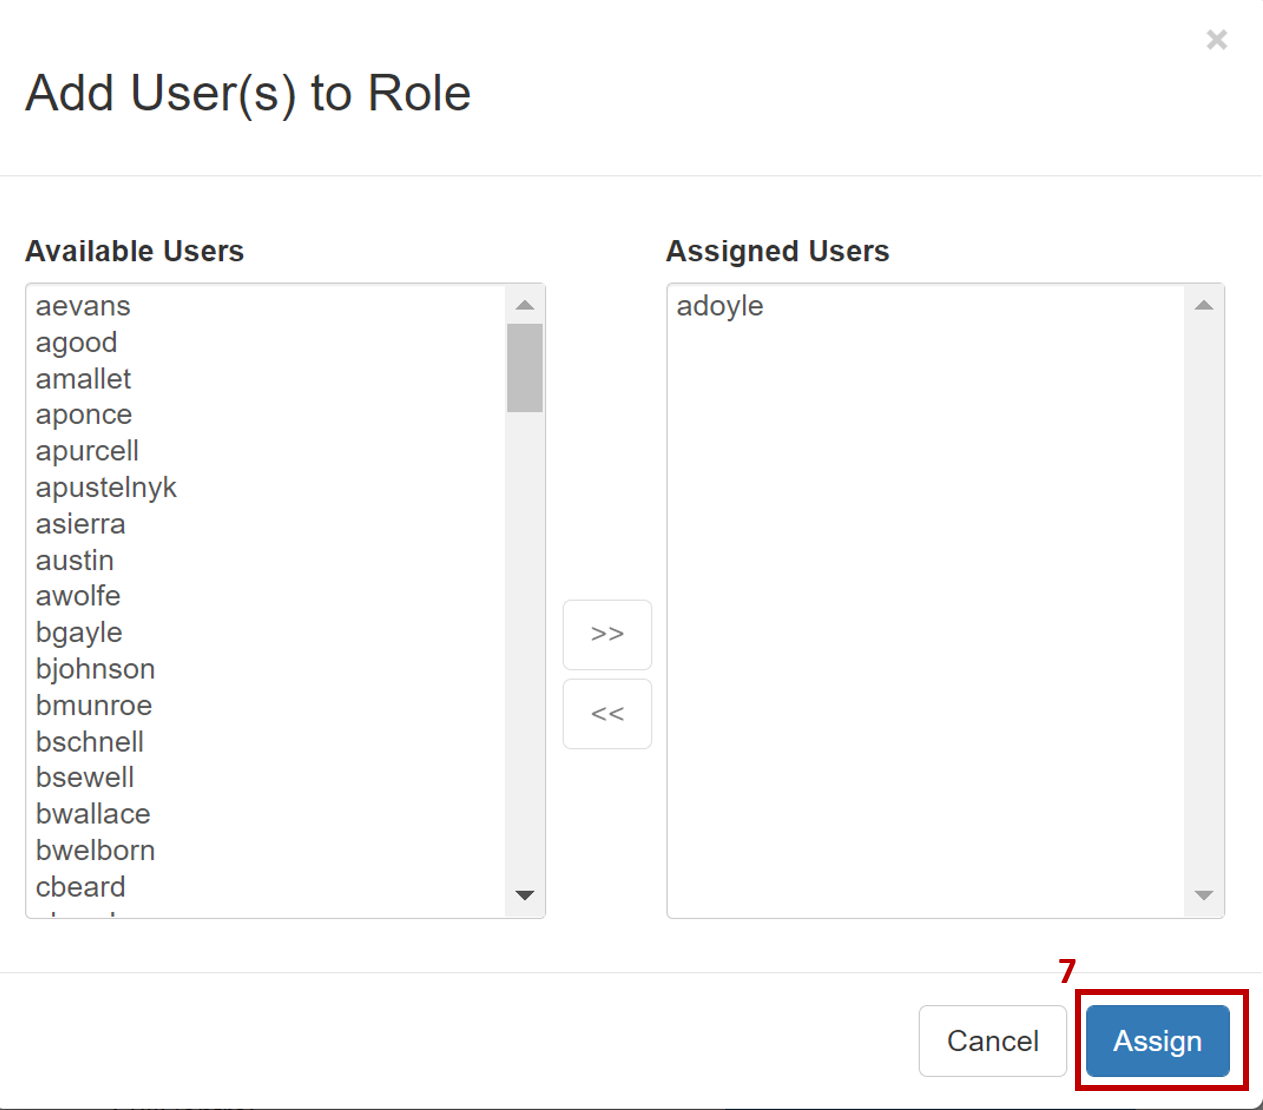
Figure 5: Click Assign.
The user you added to the role should now display under that role's members.
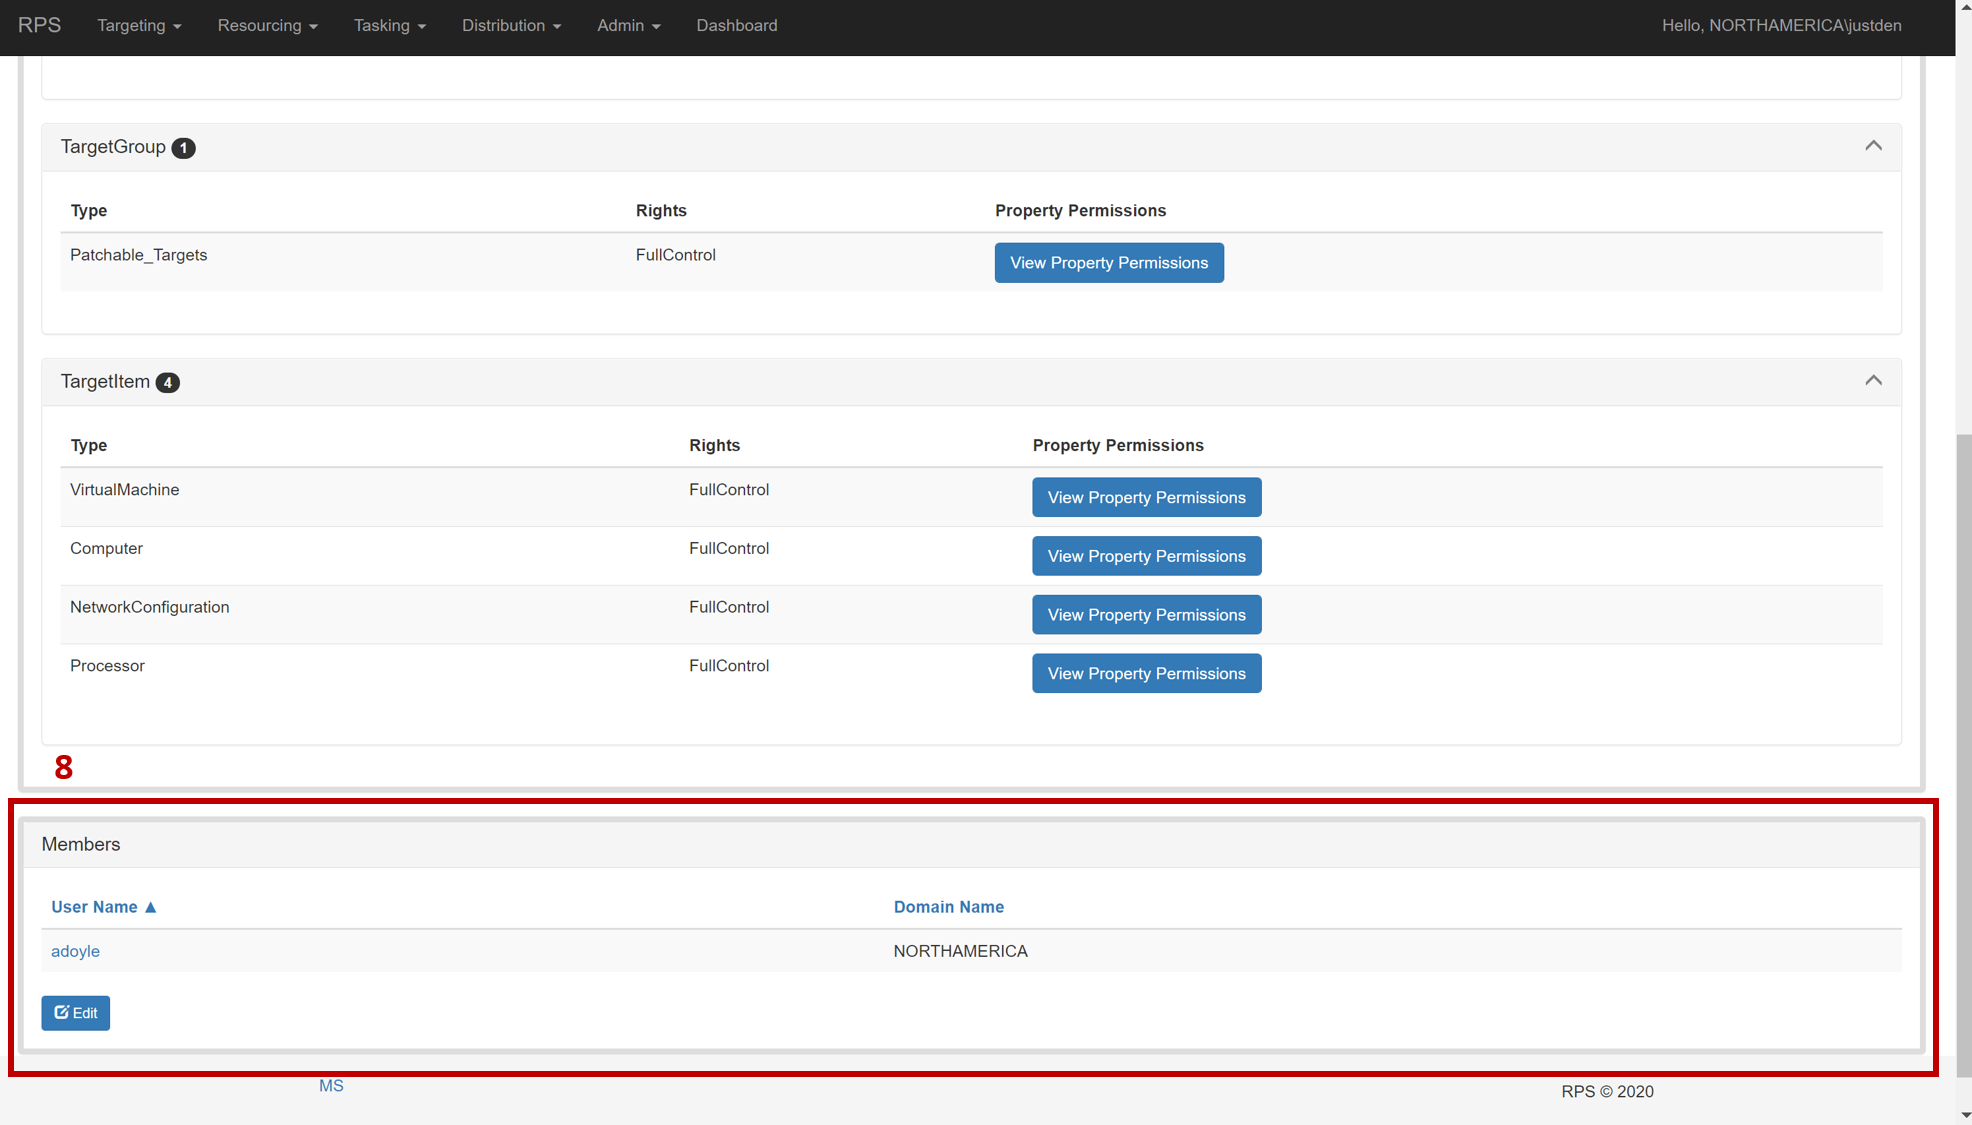
Figure 6: The added user displays under the role's 'Members' section.
How to Remove a User From a Role in RPS Using the Web User Interface
To remove a user from a role assignment:
From any page in RPS, select Admin in the navigation bar.
In the dropdown menu, select Roles.
Figure 7: Select Admin and then Roles in the dropdown.
Click on the [Role] you would like to remove a user from.
Figure 8: Select a role from which to remove the user.
Scroll to the bottom of the page. In the 'Members' section, click Edit.
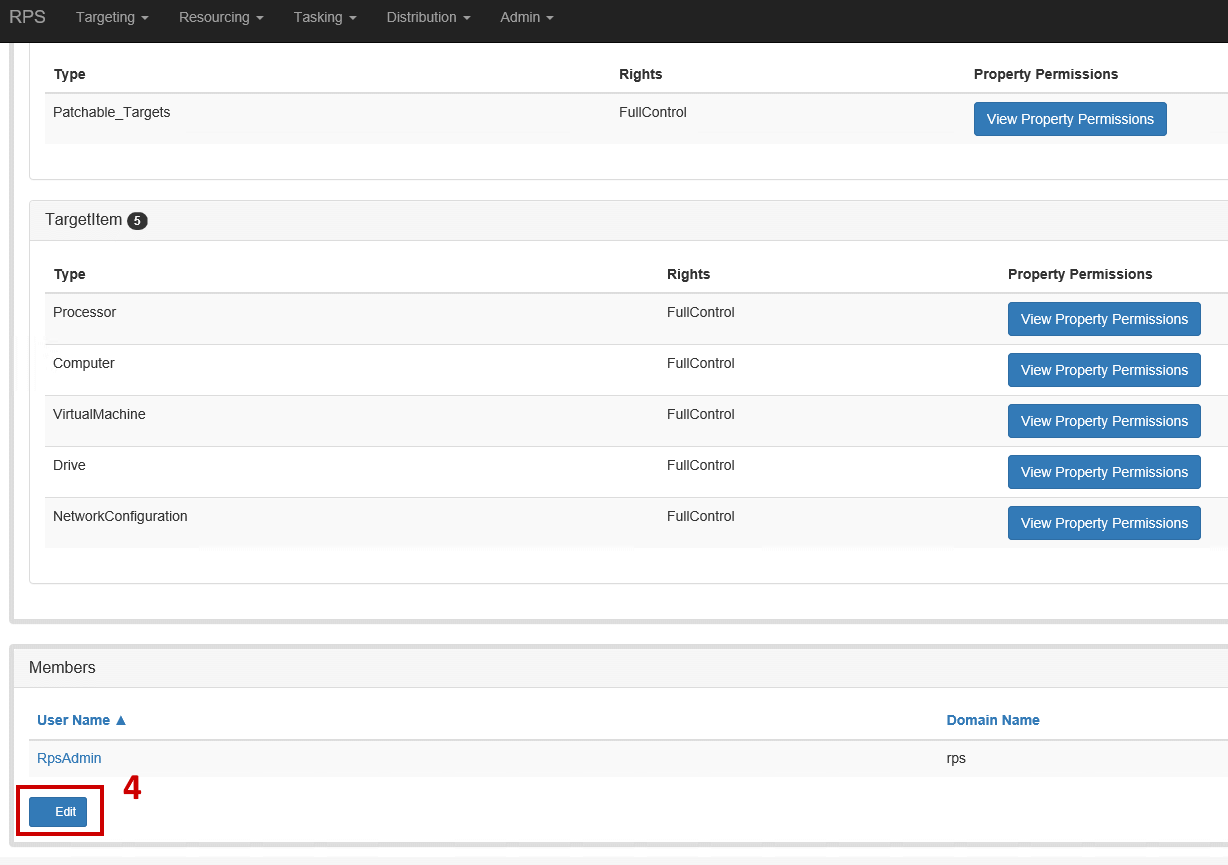
Figure 9: In the 'Members' section, click Edit.
Select the [User] you would like to remove from the role in the 'Assigned Users' section.
Click the double left arrow <<.
Note
To remove multiple users, repeat steps 5 and 6.
Click Assign.
![Figure 10: Select the **[User]** to remove from the role, click the **double left arrow <<**, and click **Assign**.](../../../../../Images/v4.0.0/RPS/Operations/RBAC/HowToAddAndRemoveUserRoles/RBAC_RemoveUserFromRole2.png)
Figure 10: Select the [User] to remove from the role, click the double left arrow <<, and click Assign.
The user(s) you removed from the role should no longer display under that role's 'Members' section.
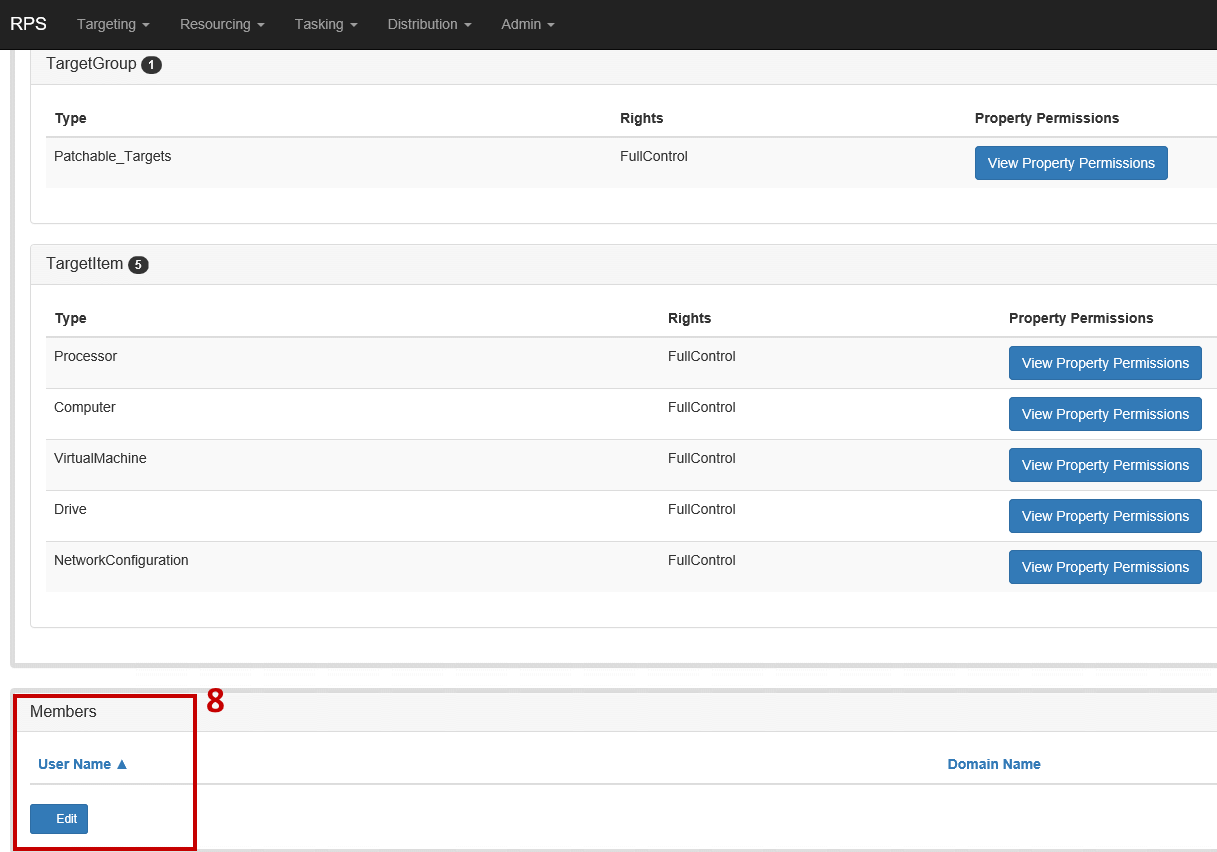
Figure 11: The removed user no longer displays in the selected role's 'Members' section.
How to Add a User to a Role, Remove a User From a Role, or View Role Assignments in RPS Using PowerShell
Using PowerShell for RBAC functions in RPS gives you the ability to do the following actions:
Find a role assignment by:
Prerequisite
Important
In order to use the subsequent code snippets, the $user and $role variables must be set. This MUST be done one time per PowerShell session.
In PowerShell, enter the following cmdlets:
$user = Get-RpsUser -UserName "user1"
$role = Get-RpsRole -Name "Patch Admin"
Important
The -UserName and -Name values used in the example above are arbitrary and should be replaced with the username and role name being acted upon.
Adding a User to a Role: The Add-RpsRoleAssignment Cmdlet
Parameters
User – Specified user.
Role – Role to be added.
How to Use the Cmdlet to Add a User to a Role
In PowerShell, enter the following cmdlet with the information appropriate for your user and role you would like to add, per the parameters above.
Add-RpsRoleAssignment –User $user -Role $role

Figure 12: PowerShell running as Administrator with the above Add-RpsRoleAssignment code snippet entered.
Removing a User From a Role in PowerShell: The Remove-RpsRoleAssignment Cmdlet
Parameters
User – Specified user.
Role – Role to be removed.
How to Use the Cmdlet to Remove a User From a Role
In PowerShell, enter the following cmdlet with the information appropriate for your user and role you would like to remove, per the parameters identified above.
Remove-RpsRoleAssignment –User $user -Role $role

Figure 13: PowerShell running as Administrator with the above Remove-RpsRoleAssignment code snippet entered.
How to Find a Role Assignment in PowerShell: The Get-RpsRoleAssignment Cmdlet
This cmdlet can get role assignment by user, role, or role ID.
Parameters
User – Specified user.
Role – Specified role.
Id – ID of the Role assigned.
How to Get a Role Assignment by User
In PowerShell, enter the following cmdlet with the information appropriate for your user you would like to view role assignment for, per the parameters identified above.
Get-RpsRoleAssignment –User $user
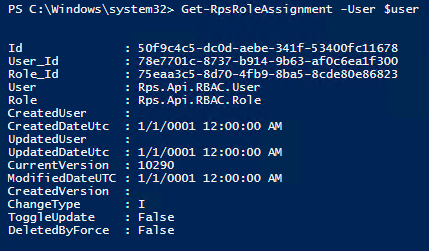
Figure 14: Using the Get-RpsRoleAssignment cmdlet to view role assignment by specified User parameter.
How to Get a Role Assignment by Role
In PowerShell, enter the following cmdlet with the information appropriate for your role you would like to view assignment for, per the parameters identified above.
Get-RpsRoleAssignment –Role $role
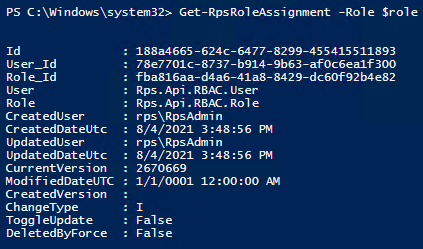
Figure 15: Using the Get-RpsRoleAssignment cmdlet to view role assignment by specified Role parameter.
How to Get a Role Assignment by ID
In PowerShell, enter the following cmdlet with the information appropriate for your role ID you would like to view assignment for, per the parameters identified above.
Get-RpsRoleAssignment –Id $lookupId
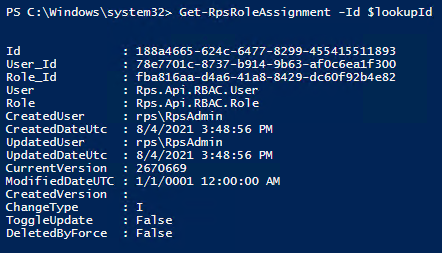
Figure 16: Using the Get-RpsRoleAssignment cmdlet to view role assignment by specified (Role) Id parameter.
How to Get All Role Assignments
In PowerShell, enter the following cmdlet:
Get-RpsRoleAssignment
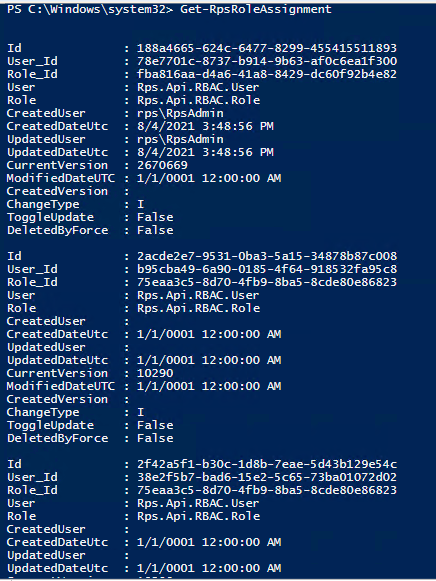
Figure 17: Using the Get-RpsRoleAssignment cmdlet to view all role assignments.