RPS PXE
Last updated on January 13, 2021.
Last Reviewed and Approved on PENDING REVIEW
A major function of the Rapid Provisioning System (RPS) is the ability for system users to perform bare metal provisioning of computing devices through the use of a Pre-Boot Execution Environment (PXE). The decision to use a basic installation of Windows Deployment Services (WDS) and Microsoft Deployment Toolkit (MDT) was made to allow for the smallest possible footprint, as well as for ease of use.
Additionally, many deployed environments that utilize RPS are very unpowered and over-provisioned, where the use of a major component such as System Center Configuration Manager (SCCM) would be impractical.
MDT and creating a WIM
Two components are required for setting up the Microsoft Deployment Toolkit (MDT) environment: 1) the Deployment Toolkit itself, and 2) the Windows Assessment and Deployment Kit (ADK), which has all of the necessary tools required to allow a user to create and customize a deployment environment using MDT.
- The MDT can be downloaded from the following link: https://www.microsoft.com/en-us/download/details.aspx?id=50407
- The ADK can be downloaded from the following link: https://www.microsoft.com/en-us/download/details.aspx?id=39982
The ADK needs to be installed first, and then MDT can be installed. Once it is installed, open the program called “Deployment Workbench”. The interface looks like the following:
Creating a Deployment Share
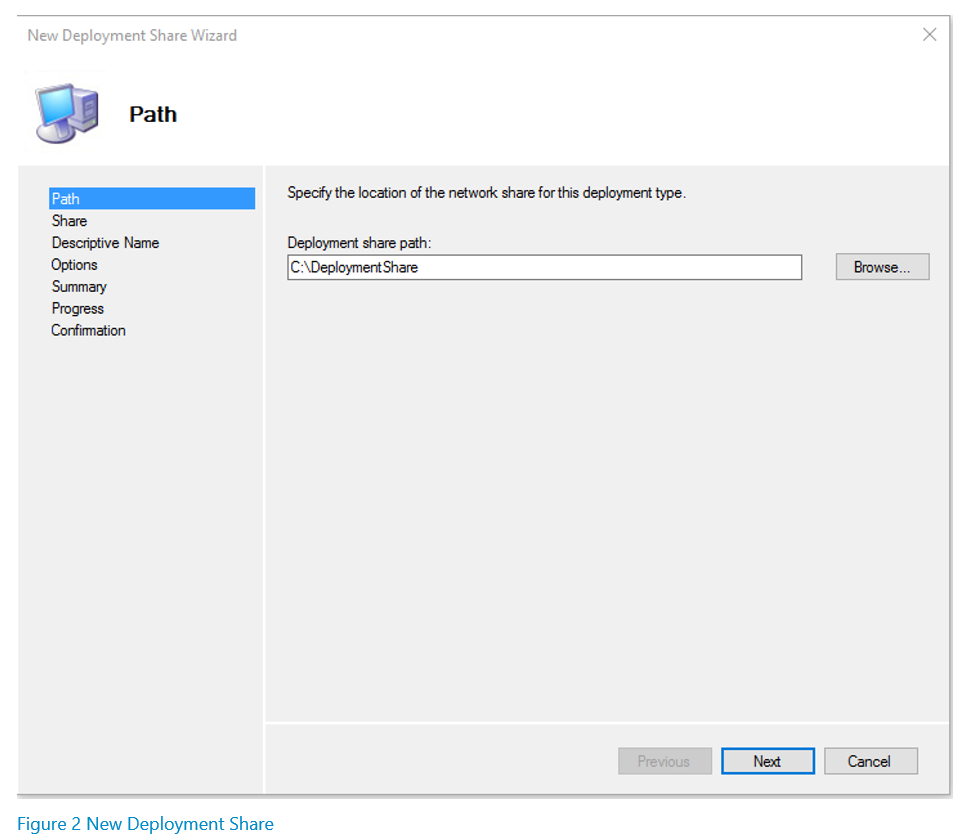
The first step in setting up the environment is to create a new deployment share. To do this, right click on “Deployment Shares” in the left pane and select “New Deployment Share”. The following wizard will appear:
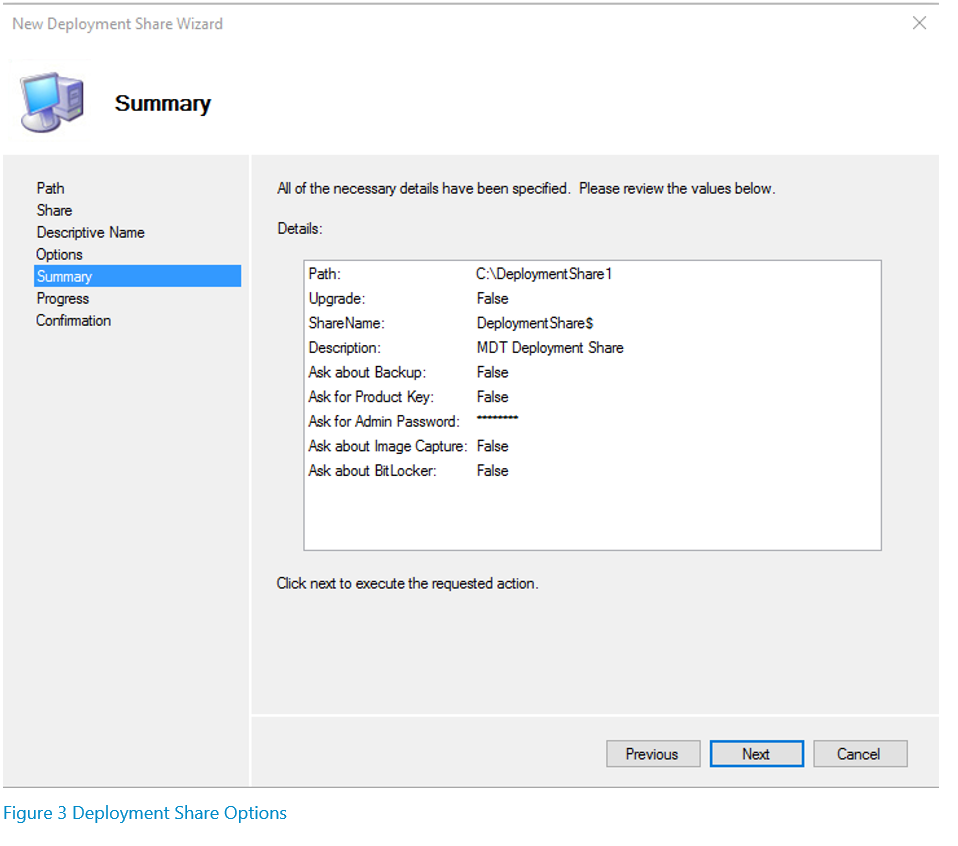
Continue through the wizard, and at the options screen, uncheck all of the options. The summary screen before the Deployment Share gets created should look like this:
Customizing a Deployment Share
1. Once the Deployment Share gets created, it will appear in the left pane under “Deployment Shares.” To customize it, right-click your deployment share, and click properties. The deployment Share Properties Screen will appear.
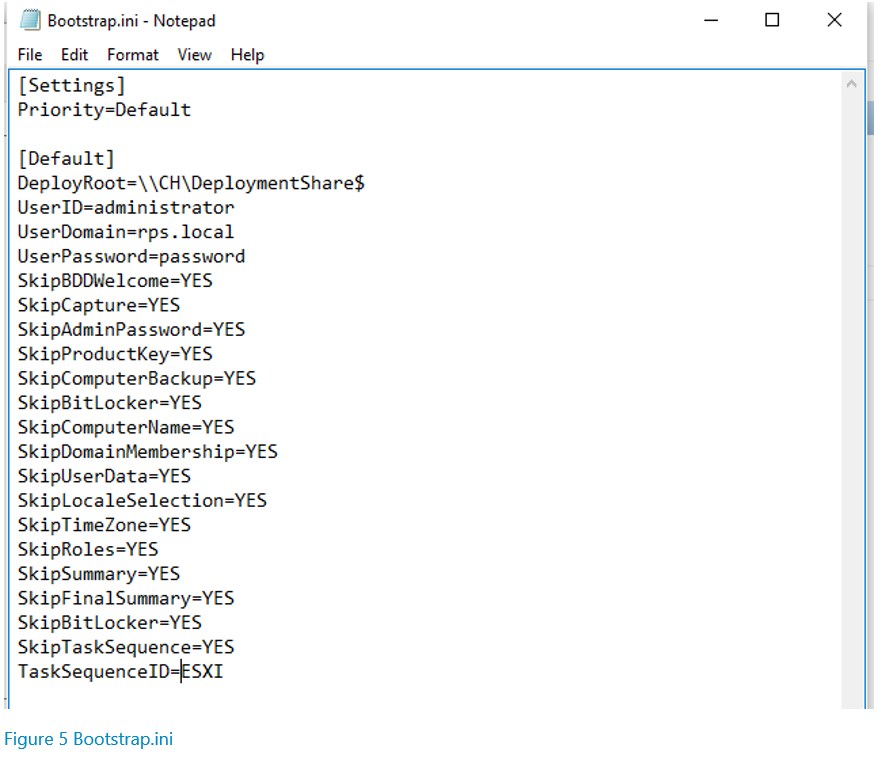
2. On the general tab, select which platforms you will support. Generally, you only need to select “x86” because then you only need to maintain one image, and it will work both on x86 and x64 platforms. On the Rules tab, click the “Edit Bootstrap.ini” button, and edit the “DeployRoot” path to be the path where the deployment share will exist in your deployment environment. In the same file, edit the UserID field to be the user which will access the deployment share from WinPE, the UserDomain to be the User’s domain, the UserPassword to be the User’s password, and the TaskSequenceID to be the ID of the Task Sequence that will be used in order to run deployments. This will be covered in a later step.
3. Save the changes you make to the Bootstrap.ini file, and continue on to the Windows PE tab. Navigate to the features tab, and select the DISM Cmdlets, .NET Framework, and Windows PowerShell check boxes.
Generating Boot Media
Prior to completing these steps for generating boot media, you need to perform steps 1-3 for customizing a deployment share.
4. The last step is to generate the Windows Imaging Format (WIM) Boot media that will be used to run deployments. To do this, right click on your deployment share, select “Update Deployment Share”, select the “Completely regenerate boot media” Radio button, and complete the wizard. The final output will look like the following:
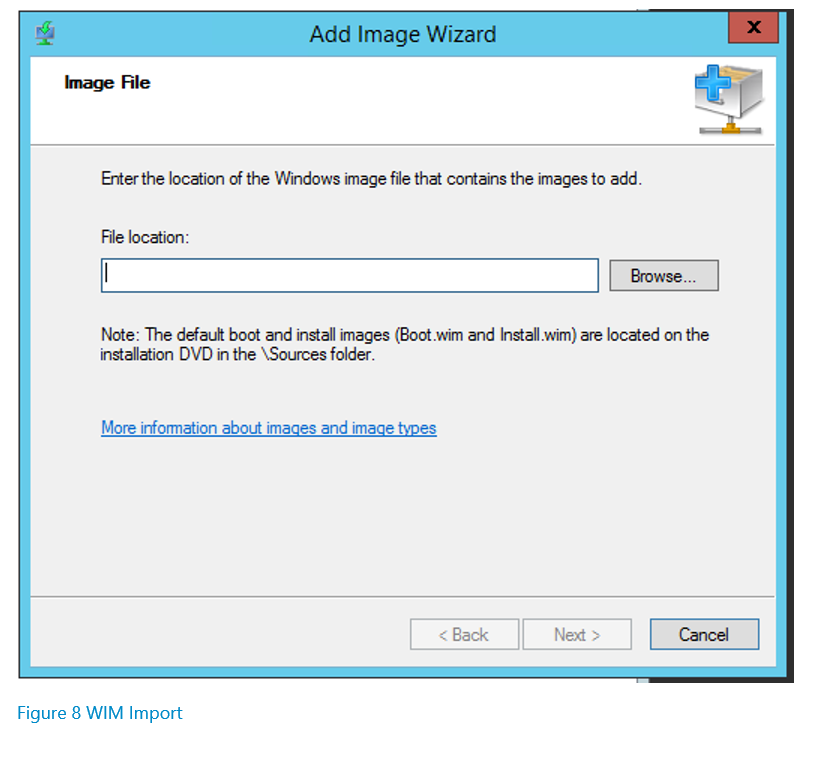
5. The WIM that is generated will be located in your deployment share folder, under the “Boot” Folder. The last step is that this WIM that is generated needs to be imported into Windows Deployment Services (WDS) on the server that is going to be responsible for running deployments. To do this, open the WDS console, expand Servers, expand your WDS server, right click on Boot Images, select “Import Boot Image”, and then navigate to your deployment share and select the WIM that you created.
Adding Drivers to WIM
There are cases where the default network and storage drivers built into the WIM are not sufficient for running deployments, and the client machine is either unable to communicate to the deployment server over the LAN or cannot access its storage. In these cases, additional drivers need to be injected into the WIM so that connectivity can be restored.
Adding Drivers to MDT
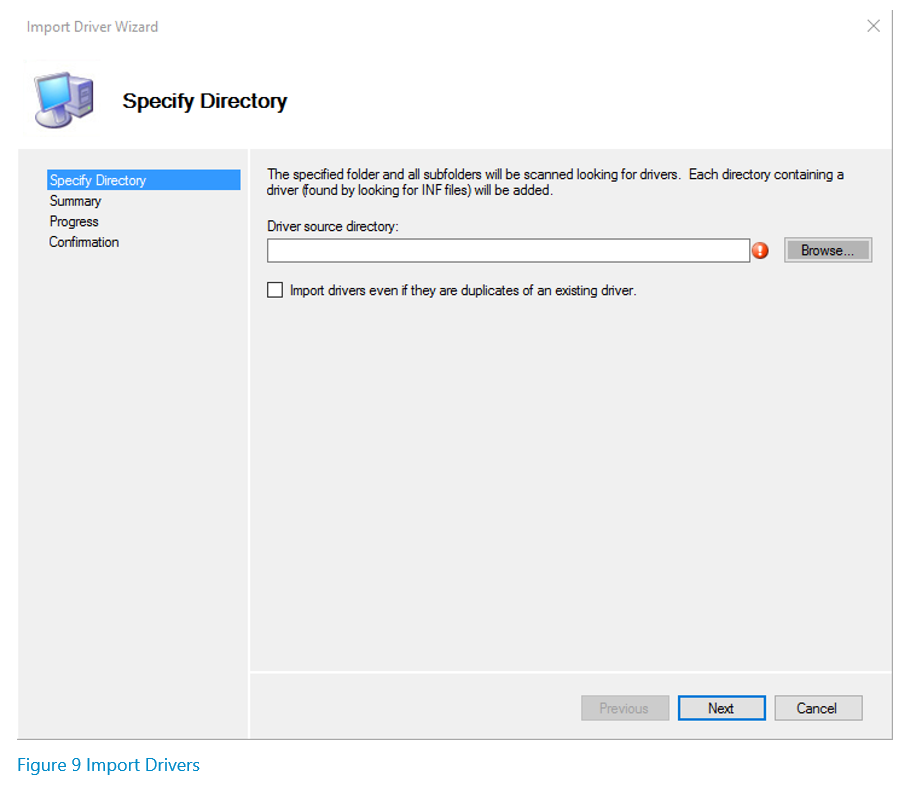
In order to inject drivers into your WIM, you need to have the drivers downloaded and available on the machine where MDT is installed. To inject the drivers, open the deployment workbench, expand your deployment share, right-click on “Out-of-Box Drivers”, and then select “Import Drivers.” The following wizard will appear:
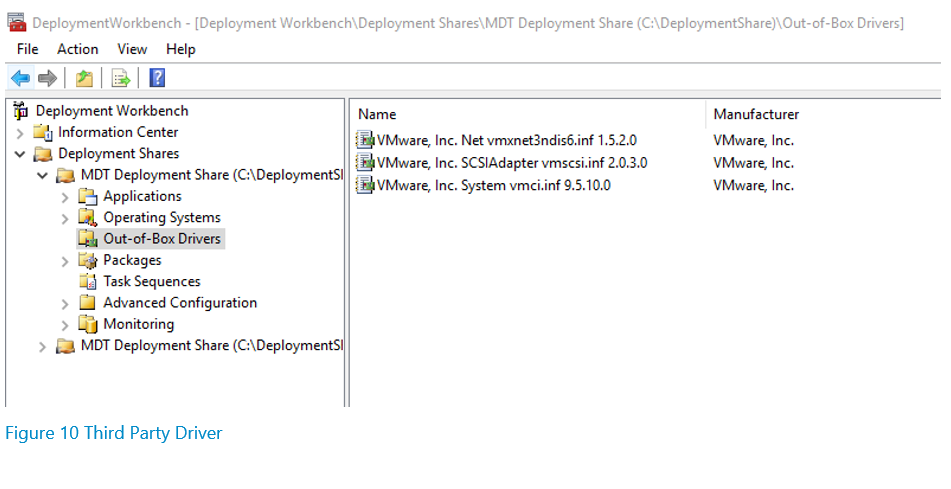
Select the browse button, navigate to the folder where your third-party drivers are located, select the folder and then complete the wizard. If the drivers are imported successfully, they will appear in the middle pane of the deployment workbench as follows:
Configuring MDT to Use Third Party Drivers
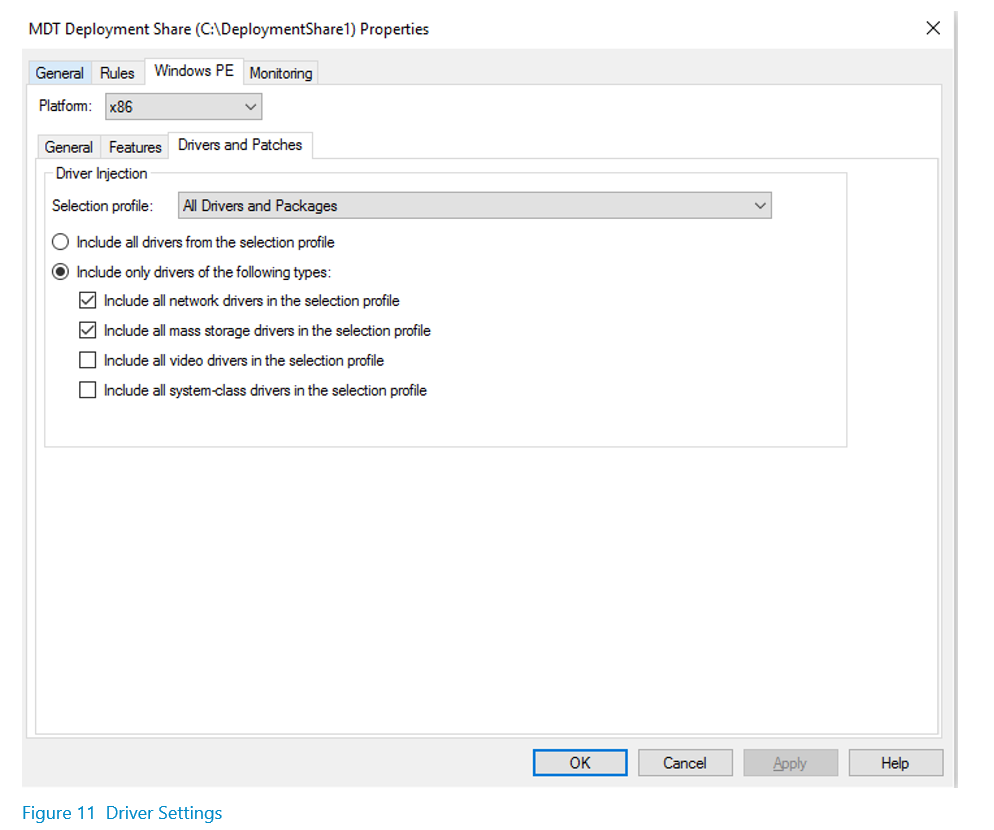
This process just makes the drivers available in your deployment workbench but has not yet injected the drivers into the WIM. To do so, right-click on your deployment share, select Properties, and navigate to the Windows PE tab, and then the Drivers and Patches tab. Select which type of drivers you want added to the WIM (you can either select all drivers that are available in your deployment workbench, or specify a specific type over driver, and then click OK.
Once you determine your settings, you need to regenerate the WIM so that the newly added drivers are injected into it. To do so, follow the process documented above in the WIM creation process.
Adding Additional Components to WIM
There are cases where additional components need to be added to your WIM, that cannot be done using the deployment workbench. One such case is adding the environment variable connection string to the registry of the WIM, so that clients that are in the Windows Pre-Boot Environment (WinPE), can import the RPS DAC dll and interface with the CMDB.
Mounting the WIM
To do this, create an empty folder on the server with MDT installed, in a location that is easily accessible. A good example of this would be something like “C:\mount”. Next, open an administrator command prompt window, and enter the following command:
Cd C:\Program Files (x86)\Windows Kits\8.1\Assessment and Deployment Kit\Deployment Tools\x86\DISM
Once in the DISM directory, issue the following command:
dism /mount-image /imagefile:C:\DeploymentShare\Boot\LiteTouchPE_x86.wim /index:1 /mountdir:C:\mount
Make sure to replace the imagefile path to the location of your WIM, and the mountdir path to where you created that folder.
Loading the WIM Registry
Navigating to the empty folder you created will now show you the contents of your WIM. The connection string that is used by the RPS API is a powerShell environment variable, which cannot be set inside of WinPE, unless already exists in the registry of the WIM file. In order to do this, open the registry editor on the machine where you mounted the WIM, select HKEY_LOCAL_MACHINE, then click File>Load Hive. Navigate to your mount directory, then to Windows, System32, config, and select the file called “System”.
Adding new Registry Keys to WIM Registry
After selecting Open, the registry editor will prompt for a key name, enter “WIM”, and then select Ok. Expand WIM>ControlSet001>Control>Session Manager>Environment. Right Click on the Environment folder and select New>String Value. For the name of the registry key enter “RPSDbAddress” and for the Value, enter the following connection string:
Data Source=DB\RPS;Initial Catalog=Rps.Database;
MultipleActiveResultSets=True;user=user;password=password
Make sure the Data Source is the name of your SQL Server\InstanceName, the catalog is the name of the RPS CMDB Database, and the user and password are the credentials of a local SQL Account with access to read and write to the database. It is important to note that the user provided in the connection string must be a local SQL account, as domain accounts are not supported when using SQL connection strings and supplying the username and password as part of the string. Once you have entered the connection string, click OK to save the registry key. The key should now appear under the Environment folder.
Data Source = DB\RPS; Initial Catalog = Rps.Database;
MultipleActiveResultSets = True; user = user; password = password
Unloading Registry and Unmounting WIM
Navigate back up to the WIM folder that was created when the registry was mounted and select File>Unload Hive. Select Yes when you are prompted to unload the hive, and then close the registry editor. Navigate back to the elevated command prompt window that you used to mount the WIM, and issue the following command, making sure to indicate the correct mount directory.
.\dism.exe /unmount-image /mountdir:C:\mount /commit
A successful commit will result in the following:
The WIM now has the proper connection string stored as an environment variable and will be able to successfully connect to the CMDB to interact with the API. If you need to add any additional third-party pieces of software, you can simply copy the executables into the Windows/System32 Folder, so that they can be called from scripts within WinPE.
Task Sequences
Task sequences are a set of instructions that the devices that boot into WinPE will execute. Using the Deployment Workbench, a user can easily add and remove steps to be performed while the client is in WinPE, as well as make task sequence variables available to the client to be consumed during execution.
Creating a Task Sequence
In order to create a Task Sequence, open the Deployment Workbench, expand your Deployment Share, right-click on Task Sequences, and select “New Task Sequence.” A wizard will open that will prompt for a Task Sequence ID as well as a Task Sequence Name. For the ID, enter a short acronym that can easily be reference in the bootstrap.ini file discussed earlier. For example, if this task sequence will be used to deploy Windows 10, a good ID would be “Win10”. The name is for your own knowledge, so you can be as descriptive as you would like in this field. Complete the wizard to create your task sequence, accepting the defaults.
Editing a Task Sequence
Once the task sequence has been created, you can begin editing it to suite your environment and the steps that you want to clients to execute in order to deploy an operating system to your clients. To being editing your Task Sequence, right-click on the Task Sequence in the Deployment Workbench and select “Properties”, the navigate to the “Task Sequence” tab. The following window will appear. Note: This is an example of a task sequence where task sequence variables and steps have already been supplied.
In order to add steps to your Task Sequence, click on the “Add” button at the top, select “General” and then select “Set Task Sequence Variables.” Task Sequence Variables are pieces of information that clients will need to perform various functions. For example, if the client is going to need to interface with RPS, it will need to know the Web Service Endpoint of the RPS server. Instead of hardcoding that address into the script that will interface with RPS, it can be supplied as a variable that can be consumed by the client, should it ever need to change.
Generally, it is recommend that you supply all of your necessary Task Sequence Variables as the first steps in the Task Sequence, so that they are available to the client before any actual deployment logic is performed. After you have inputted all of your necessary Task Sequence Variables, you can proceed to adding steps that require PowerShell Scripts to be executed, as well as any other options that are required. All the available options are available under the “Add” button. Note: If you are adding PowerShell scripts as steps in your task sequence, for the value of the “PowerShell script” field, the name of the script should be entered in the following manner:
%SCRIPTROOT%\FilenameOfScript.ps1
All of the scripts required by your task sequence should be placed in the “Scripts” folder of your Deployment Share.
Credential Masking
Clients that boot into WinPE are not domain joined, and usually need domain account credentials in order to perform various functions throughout the Task Sequence. One such example is if the client needs to interface with (Job Host Server TBD) in order to start a Runbook. Storing the password as clear text is not recommended, and one method of getting around this is to use PowerShell Obfuscation.
Encoding
Credentials within PowerShell as stored and consumed as Secure Strings. In order to do this, open a PowerShell session and issue the following command, replacing “Password” with the password you want to secure:
$pass = "Password" | ConvertTo-SecureString -AsPlainText –Force
Converting to Masked Credential
If you return the $pass variable created above, you will note that it does not return the value of your “Password”, but instead returns a PowerShell Object of Secure String. What we want to return is the hash that is generated from securing the password. In order to do this, in the PowerShell session that you have open, issue the following command:
$hash = ConvertFrom-SecureString $pass -Key (1..16)
Now if you return $hash, a very long string of characters will be returned, which is the hashed version of your secure password. You can then take this hashed value and store it as a Task Sequence Variable in your task sequence, to be consumed and utilized by clients booting into WinPE.
Converting Masked Credential Back to a Secure String
In order to convert the hashed value back into a Secure String, the following command is used:
$pass = $hash | ConvertTo-SecureString -Key (1..16)
Workflow Examples
The following section will provide some very basic examples of how to perform certain operations in PowerShell scripts that run within WinPE, how to interact with the RPS API, and how to interface with the Controller.
Using Masked Credential
The previous section described how to create a password hash to be consumed as a Task Sequence Variable. The following syntax is used to read the task sequence variable and use it to create a credential object for PowerShell to utilize within WinPE. Note the name of the Task Sequence Variable in question is “Password” and the value is the hash that was created by following the steps from the previous section.
$MS_ConfigMgr_Env = New-Object -ComObject Microsoft.SMS.TSEnvironment
$Password = $MS_ConfigMgr_Env.Value ("Password")
$Username = $Ms_ConfigMgr_Env.Value ("Username")
$cred = $Password | ConvertTo-SecureString -key(1..16)
credentials = New-Object System.Management.Automation.PSCredential ($UserName, $cred)
Importing RPS API
The following syntax is used to import the RPS API so that clients within WinPE can interact with the DAC and CMDB. Note, the RPS API should be placed in the Deployment Share, under the Applications Folder, and then in its own folder called DAC.
$MS_ConfigMgr_Env = New-Object -ComObject Microsoft.SMS.TSEnvironment
$deploymentSharepath = $MS_ConfigMgr_Env.Value("DeploymentSharePath")
Import-Module "$deploymentSharePath\Applications\DAC\Rps.Api.dll"
Bare Metal Provisioning Approval
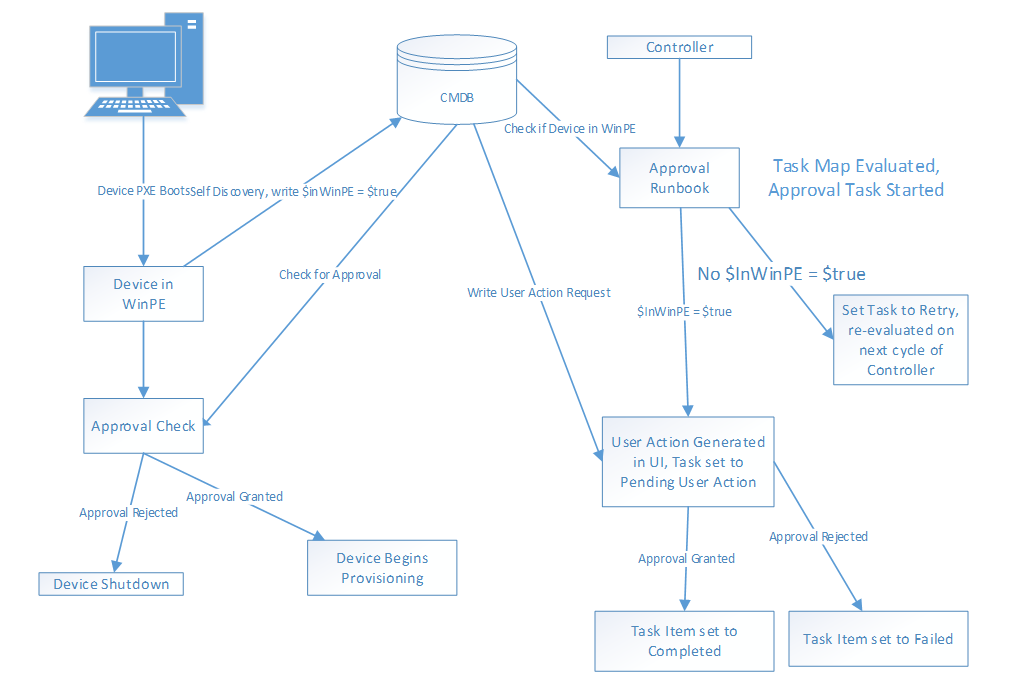
On headless systems, administrators using RPS need a way to approve provisioning of client devices before their hard drives are wiped and a new Operating System installed on the hard drive. The following set of steps give an example of how users utilizing the RPS toolset would be able to perform an example approval process. The diagram below is an example overview of this process.
Client generates flag that it is in WinPE
First, the client needs to set a flag for its Target Item that it has booted into WinPE, so that the controller is aware and can generate the approval. For the first PowerShell script that runs in the Task Sequence, some kind of code similar to the following should be used. In short, the client is querying the CMDB for its Target Item, and setting a property called “InWinPE” to $true.
# find the Client

$Client = Get-RpsTargetItem -Name $ComputerName

if($Client)
{
    $Client.IsActive = $true
    $Client.InWinPE = $true
    Update-RpsTargetItem -TargetItem $Client
}
Approval Runbook
The following is an example Runbook that is run by the Controller to check if a client has booted into WinPE, and if so, generate an approval task for an administrator either Approve or Reject. Note, this should be the first step in the TaskMap associated with the client device, so that no automations proceed on the client until this approval has been granted.
workflow New-BareMetalApprovalTask
{
    param
    {
        [parameter(Mandatory = $true)][string]$taskAssignmentId]
    }

# Disables serialization of objects in certain circumstances allowing for method calls.
    $PSDisableSerializationPreference = $true

    $taskassignment = Get-RpsTaskAssignment -Id $taskAssignmentId
    $targetitem = Get-RpsTargetItem -Id $taskassignment.TargetItemId

    if($targetitem.InWinPE -eq $true)
    {
        New-RpsTaskAssignmentUserAction -TaskAssignmentStatusId $taskAssignmentId
        $null = ($targetitem.ApprovalAssignmentId = "$taskAssignmentId")
        $null = Update-RpsTargetItem -TargetItem $targetitem
        $null = ($taskassignment.StatusMessage = "Approval Generated")
        $null = ($taskassignment.TaskState = "PendingUserAction")
        $null = Update-RpsTaskAssignment -TaskAssignment $taskassignment
    }
    else
    {
        $null = ($taskassignment.TaskState = "Retry")
        $null = ($taskassignment.StatusMessage = "Target Item is not in WinPE")
        $null = Update-RpsTaskAssignment -TaskAssignment $taskAssignment
    }
}
Client Checks for Approval
Prior to the step in the Task Sequence where the client wipes its hard drive and lays down the new Operating System, it needs to verify that approval has either been received or denied. To do this, a PowerShell script similar to the following example should be created and placed on the Deployment Share, and then called from the task sequence.
# Obtain TS vars
$MS_ConfigMgr_Env = New-Object -ComObject Microsoft.SMS.TSEnvironment
$deploymentSharePath = $MS_ConfigMgr_Env.Value("DeploymentSharePath")

# Set Computer Name
$ComputerName = "$ClientComputerName"

# Import DAC
Import-Module "$deploymentSharePath\Application\DAC\Rps.Api.dll"

# find the client in CMDB
$Client = Get-RpsTargetItem -Name $ComputerName

# find the Task Assignment
$TaskAssignment = $Client.Properties | where Name -eq "ApprovalAssignmentId"
while($TaskAssignment)
{
    Start-Sleep -Seconds 5
    $Client = Get-RpsTargetItem -Name $ComputerName
    $TaskAssignment = $DCE.Properties | where Name -eq "ApprovalAssignmentId"
}
$TaskAssignment = $TaskAssignment.Value

# Monitor for Approval/Rejection
if ($TaskAssignment)
{
    do
    {
        Start-Sleep -Seconds 5
        $Status = (Get-RpsTaskAssignment -Id $TaskAssignment).TaskState
    }
    while (($Status -ne "Completed") -and ($Status -ne "Canceled"))

    if($Status -eq "Completed")
    {
        $DCE.InWinPE = $null
        Update-RpsTaskAssignment -TaskAssignment $DCE
    }

    if($Status -eq "Canceled")
    {
        $DCE.InWinPE = $null
        Update-RpsTaskAssignment -TaskAssignment $DCE
        wpeutil shutdown
    }
}
Glossary
| Term | Definition |
|---|---|
| ADK | Assessment and Deployment Kit. |
| CMDB | Configuration Management Database. |
| MDT | Microsoft Deployment Toolkit. |
| RPS | Rapid Provisioning System – A Toolset used to perform automations. |
| Runbook | A “task” executed within TMS, may contain multiple workflows. |
| Runbook Worker | The TMS service that processes and executes Runbooks. |
| SCCM | Microsoft System Center Configuration Manager. |
| TMS | Task Management Service - hosts & runs runbooks, used by RPS. |
| TaskMap | Identifies a set of steps, what order they should be performed in, and what target items those steps apply to. |
| Web Service | A web-based receiver that enables connectivity from other applications. |
| WDS | Windows Deployment Services – A windows service used to perform provisioning of clients. |
| WIM | Windows Imaging Format – A Bootable file allowing a client to enter WinPE. |
| WinPE | Windows Pre-Boot Environment – An Environment that runs in memory on the client that is used to provision the client. |

