How to Import RPS Data Into the CMDB
Last updated on August 23, 2021.
Document Status: Document Developer Quality Complete.
Introduction
RPS provides the ability to export various data to an XML file, which can then be imported. To see more information on how to export RPS data and which kinds of data can be exported, see How to Export the CMDB.
RPS data can be imported using the following two methods: using the RPS GUI or using PowerShell.
Import RPS Data Using the RPS GUI
From the RPS header, select Admin → Import.
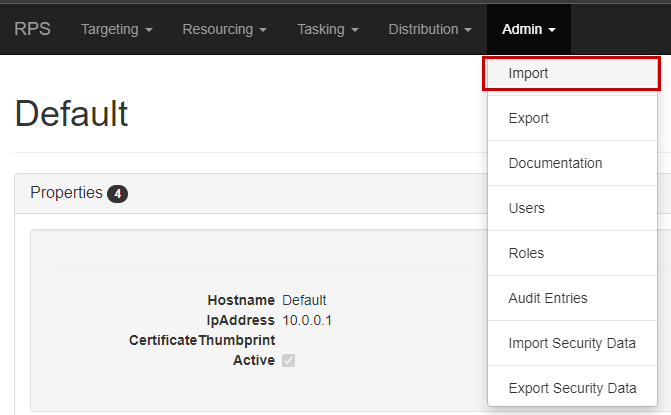
Figure 1: Navigating to the RPS Import screen.
This will take you to the "Upload Import File" view.
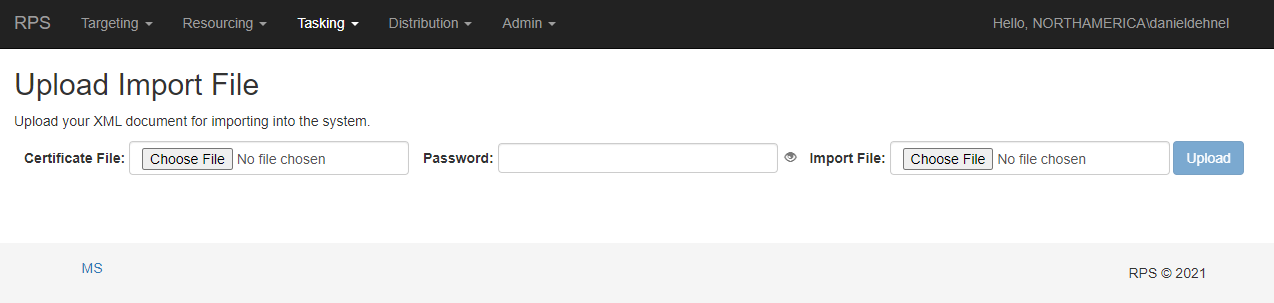
Figure 2: The RPS Import screen.
Note
RPS supports importing both encrypted and unencrypted files. In order to import encrypted files, the encrypting certificate and password must be provided alongside the encrypted data file. If importing an unencrypted file, only the data file needs to be provided.
For encrypted files, proceed to Step 2. For unencrypted files, skip ahead to Step 5.
If importing an unencrypted file, skip to Step 4. If importing an encrypted file, click the Choose File button next to "Certificate File". Select the certificate needed to decrypt the encrypted data file.
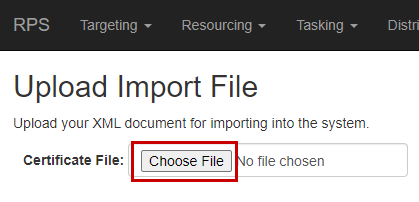
Figure 3: Select the certificate file.
Important
Only .pfx files are supported for certificate file upload. Attempting to upload a different file type will result in an error message on upload (Step 5).
If importing an unencrypted file, skip to Step 4. If importing an encrypted file, the password must also be provided. Type in the password in the Password field. The eye icon to the right of the field will toggle showing/hiding the password characters.
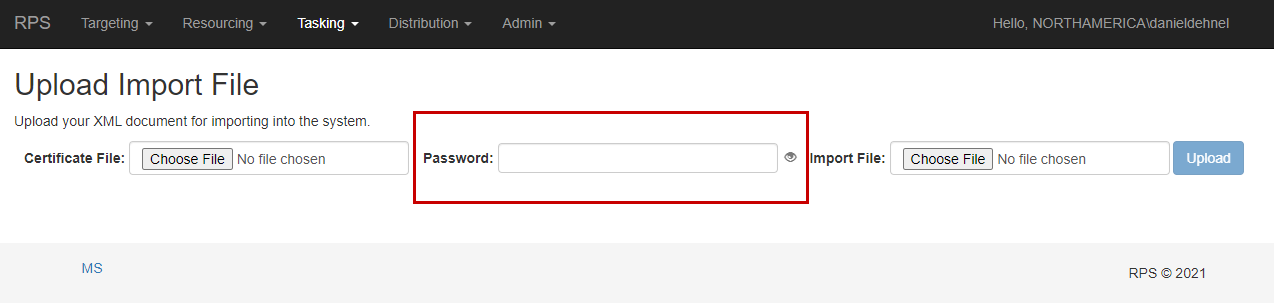
Figure 4: Type in the password.
Click the Choose File button next to "Import File" and select the data file to import.
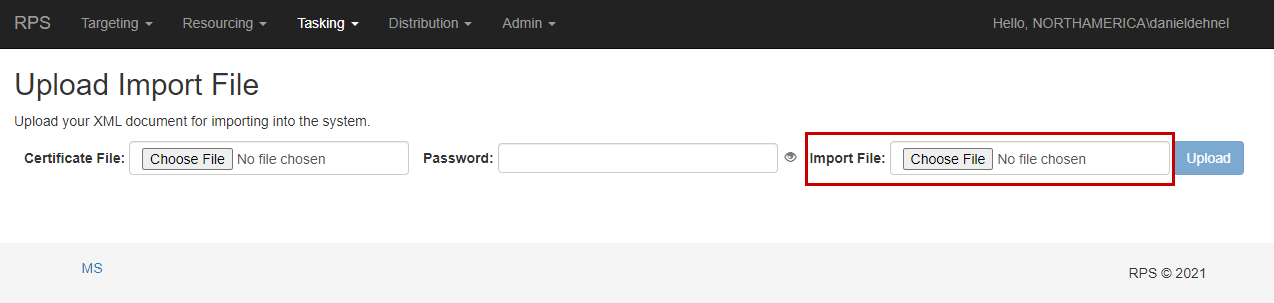
Figure 5: Select the data file to import.
Important
Only .xml files are supported for import data file upload. Attempting to upload a different file type will result in an error message on upload (Step 5).
The Upload button should now be enabled.
Once the Import File and Certificate/Password (if encrypted) have been entered, click Upload.

Figure 6: Click Upload.
If no errors display, proceed to Step 6. Otherwise, go to the troubleshooting section below for support.
If no errors are encountered, the "Data To Be Imported" view will display. The following data can be selected to import into the CMDB: Root Node(s), Target Item(s), Target Group(s), Resource Item(s), Resource Group(s), Task Map(s), and Task Item(s).
Alternatively, if all items in the data file should be imported, check the Select All checkbox at the top of the view to select all items in the data file for import.
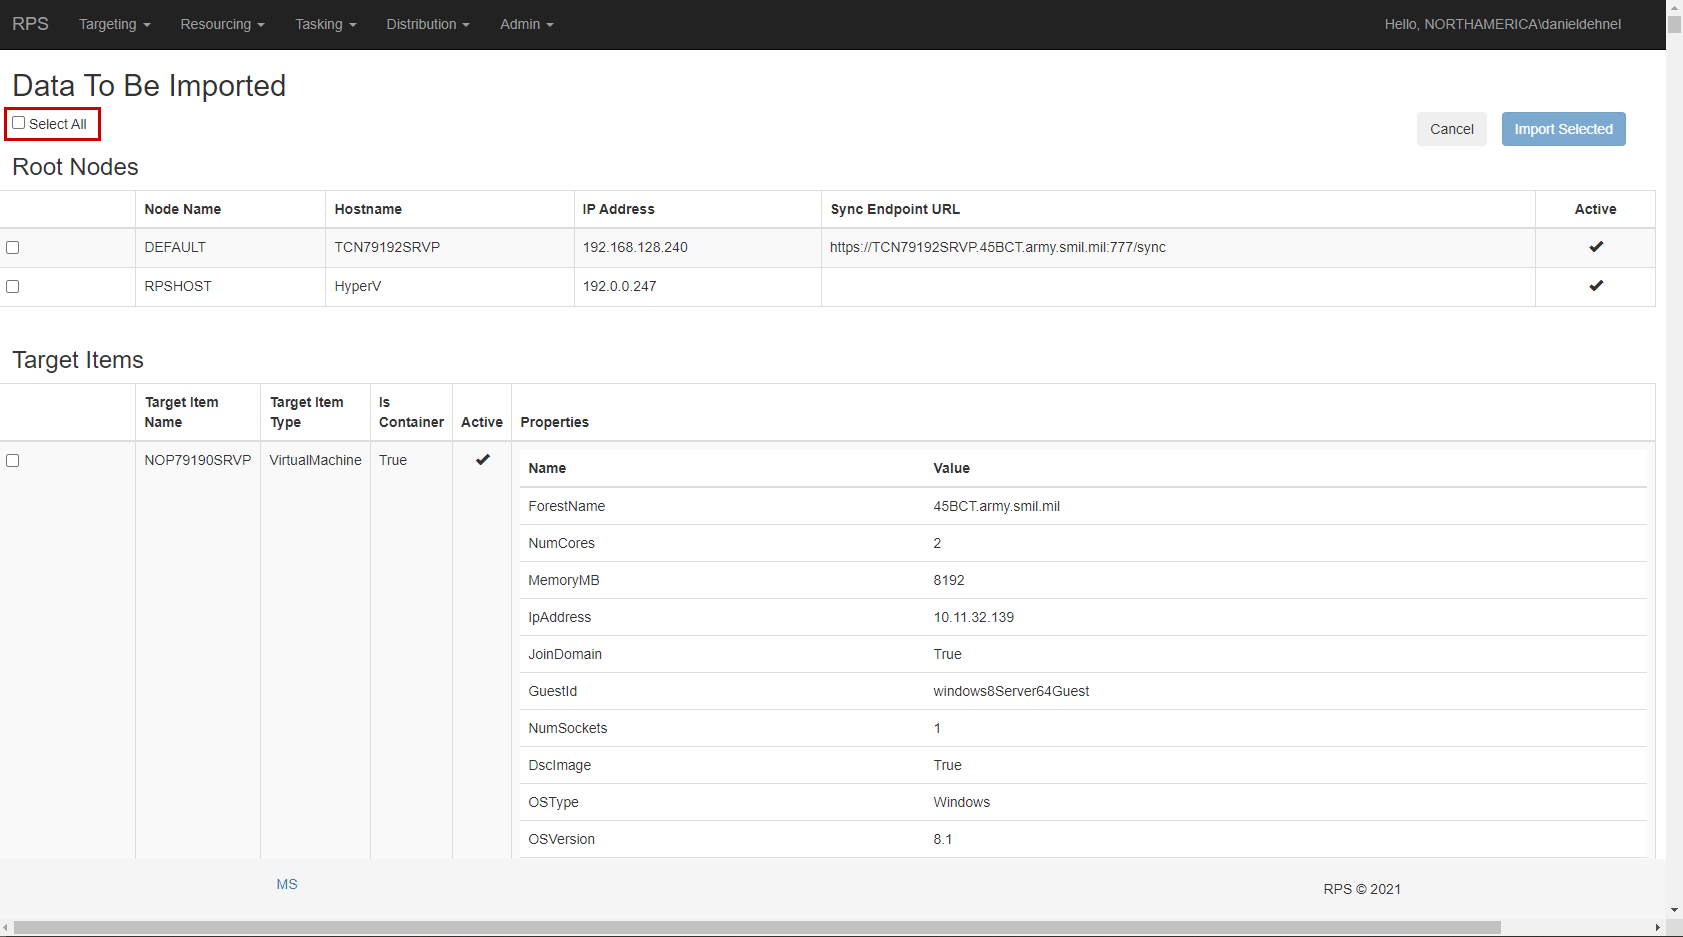
Figure 7: Select all, or choose individual items to import.
Once at least one item is selected for import, the Import Selected button will be enabled.
Once everything to import is selected, click the Import Selected button to begin the import process. Upon completion, the message "Import was successful." will display.
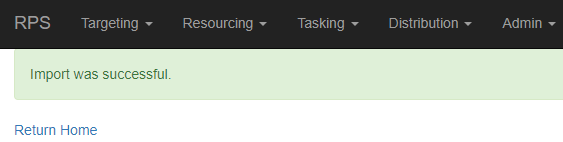
Figure 8: Import was successful.
RPS GUI Import Troubleshooting
Invalid File Type

Figure 9: "Invalid File Type!" error message.
- Only .pfx files are supported for certificate file upload (see Step 2).
- Only .xml files are supported for import data file upload (see Step 4).
The XML Was Not Recognized

Figure 10: "The xml was not recognized" error message.
There were errors parsing the XML file. Possible reasons are:
- The file is not valid.
- The data file is encrypted, and the correct certificate was not provided (see Step 2).
A Password is Required
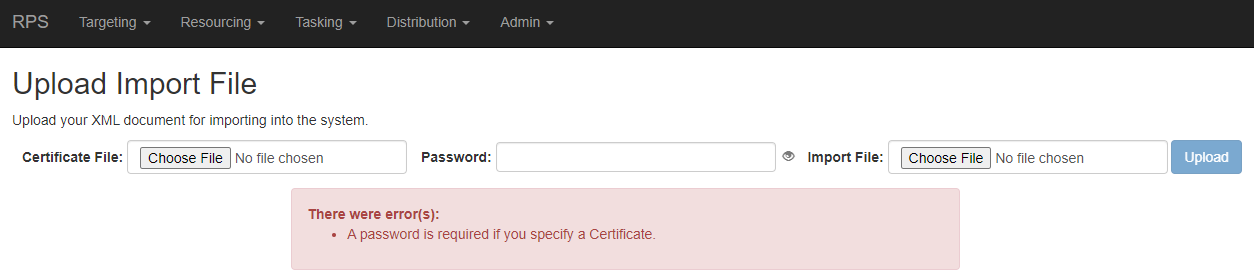
Figure 11: "A password is required" error message.
If a certificate is provided, then the password must also be provided (see Step 3).
Import RPS Data Using PowerShell
Importing via PowerShell is accomplished with the Import-RpsData cmdlet.
Like importing using the RPS GUI, both unencrypted and encrypted data files can be imported using PowerShell.
In addition, Import-RpsData can also import text, such as XML content generated from XML conversion cmdlets.
Note
The values used for the parameters in the example code snippets throughout this section are for example only, and should be changed to real values when used.
How to Import an Unencrypted Data File
In order to import an exported XML data file, the -Path parameter must be passed.
Import-RpsData -Path "C:\Users\currentuser\Documents\rps-export-test-node.xml"
See Figure 12 below as an example for importing an unencrypted data file containing a single node.
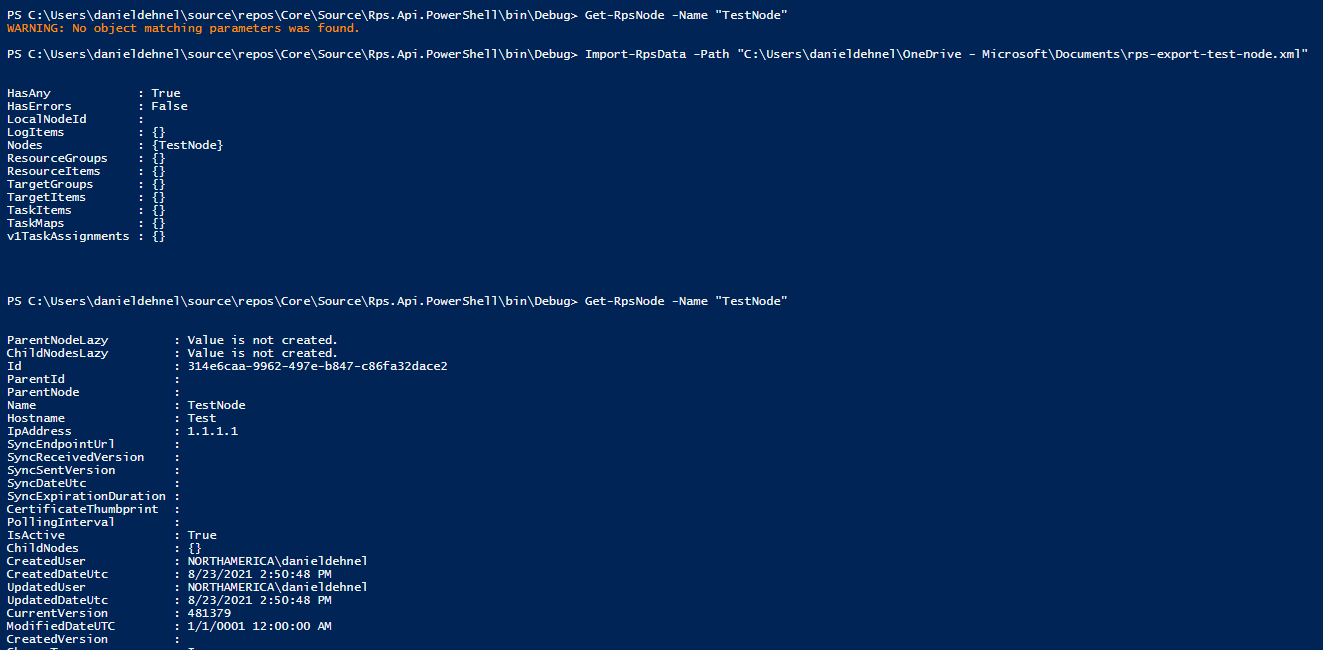
Figure 12: Importing an unencrypted data file using PowerShell.
Refer to Import-RpsData Output at the end of this article to learn more about the returned results.
How to Import XML Data Contained Within PowerShell
Import-RpsData can import straight text,
such as XML content generated from XML conversion cmdlets, using the -Text parameter.
Import-RpsData -Text $testNode
Here is an example snippet that is storing RpsData XML content to the $testNode variable, then importing it via the -Text parameter.
$testNode = '<?xml version="1.0" encoding="utf-16"?>
<RpsData xmlns:xsi="http://www.w3.org/2001/XMLSchema-instance" xmlns:xsd="http://www.w3.org/2001/XMLSchema">
    <LocalNodeId xsi:nil="true" />
    <LogItems />
    <Nodes>
        <Node
          Hostname="Test"
          Id="314e6caa-9962-497e-b847-c86fa32dace2"
          IpAddress="1.1.1.1"
          IsActive="true"
          Name="TestNode">
            <ChildItems />
            <LastSyncTimeUTC xsi:nil="true" />
            <PollingInterval xsi:nil="true" />
            <Properties />
            <SyncExpirationDuration xsi:nil="true" />
            <SyncVersion xsi:nil="true" />
        </Node>
    </Nodes>
    <ResourceGroups />
    <ResourceItems />
    <TargetGroups />
    <TargetItems />
    <TaskItems />
    <TaskMaps />
    <TaskAssignments />
</RpsData>'

Import-RpsData -Text $testNode
See Figure 13 using the above example to import XML using the -Text parameter and the resulting output.
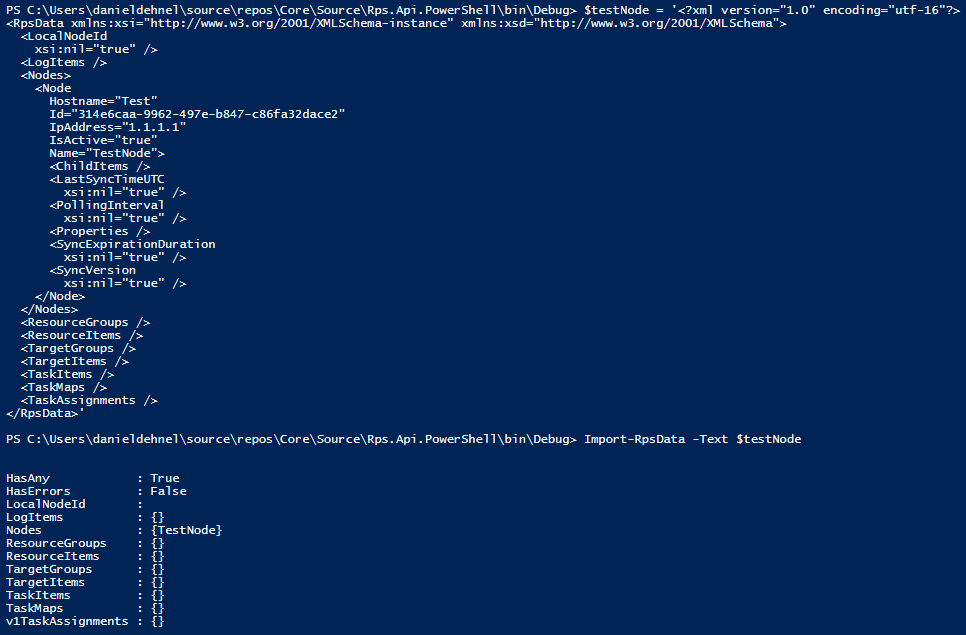
Figure 13: Importing XML text directly within PowerShell.
Refer to Import-RpsData Output at the end of this article to learn more about the returned results.
How to Import an Encrypted Data File
When importing an encrypted data file, the certificate must be provided, or an error will be thrown:

Figure 14: Error thrown when importing an encrypted data file without a certificate.
When importing an encrypted data file, the certificate can either be passed as a .pfx file and password, or the thumbprint of a locally installed certificate.
Using Certificate File and Password
In order to import an exported XML data file, the -Path parameter must be passed.
The file path to the .pfx certificate needed to unencrypt the data file is passed using the -Certificate parameter,
and the password with the -Password parameter.
Important
The password must be passed as a SecureString object.
A String password can be converted to a SecureString using the ConvertTo-SecureString cmdlet.
Import-RpsData -Path "C:\Users\currentuser\Documents\rps-export-test-node-encrypted.xml" -Certificate "C:\Users\currentuser\Documents\test_cert.pfx" -Password $securePassword
An example of importing while passing the .pfx certificate and password and the resulting output is shown below.

Figure 15: Import an encrypted data file with .pfx certificate and password.
Refer to Import-RpsData Output at the end of this article to learn more about the returned results.
Using Certificate Thumbprint
In order to import an exported XML data file, the -Path parameter must be passed.
The thumbprint of the installed certificate needed to unencrypt the data file is passed using the -CertificateThumbprint parameter.
Import-RpsData -Path "C:\Users\currentuser\Documents\rps-export-test-node-encrypted.xml" -CertificateThumbprint "f53bdaaae346627bd2657bce9e5fe81d07219c9dd"
An example of importing an encrypted data file using the thumbprint of an installed certificate and the resulting output is shown in Figure 16 below.

Figure 16: Import an encrypted data file with installed certificate thumbprint.
Refer to Import-RpsData Output at the end of this article to learn more about the returned results.
Import-RpsData Output
The object returned by the Import-RpsData cmdlet contains several fields that describe the import results.
HasAny
Type: Boolean
Returns True if any RPS data was found and imported. Returns False if no data was found.
See Figure 17 for an example where an empty import file was imported.

Figure 17: Importing an empty data file.
HasErrors
Type: Boolean
Returns True if any errors were encountered while importing, such as if the exported data does not contain the required fields.
See Figure 18 for an example of an invalid import attempt.
 Figure 18: Importing with errors.