How to Add a Node to an Existing RPS Environment
This guide will describe how to add a new unparented node to an existing RPS Environment. For the following steps, the example environment is as follows:
- APP.Master
- APP.Region
- APP-S.Region
- APP-S2.Region 1. This node is added after the initial deployment and does not initially have a parent
- APP.Region
- Login to APP.Region and App-S2.Region as RPSAdmin
Run this command on App.Region to see the details of the App.Region node. These details will be used in the next step.
Get-RpsNodeRun this command on Site2 to create the Region node:
New-RpsNode -NodeId <id_of_app.region> -Name Region -SyncEndpointUrl <sync_endpoint_url_of_app.region> -CertificateThumbprint <certificate_thumbprint_of_app.region> -Hostname <hostname_of_app.region> -IpAddress <ip_address_of_app.region>Run these commands on Site2. The last command will show the details of the APP-S2 node. These details will be used in the next step.
$node = Get-RpsNode -Name Site2
$node.ParentNodeId = <id_of_app.region>
$node.Update()
$node
Known Issue: Making changes to child node prevents properties from being visible from ancestor nodes when in session Current Workaround for displaying child node properties at parent node level: After making changes to any node that has a Parent Node use the following PowerShell command to fix the issue:
$parent.AddChildNode($child)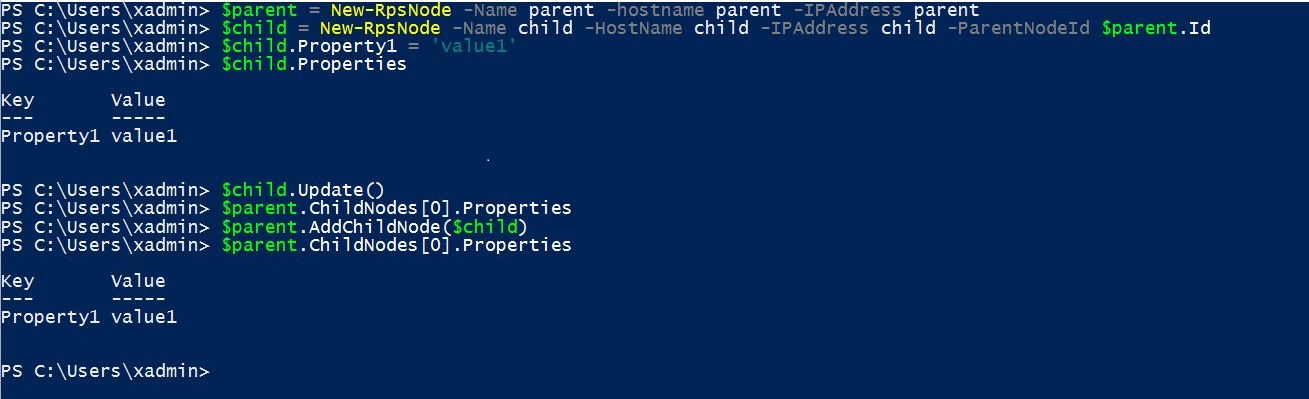
Note
This method works regardless of the ancestry depth. Re-adding a grandchild to its parent makes the properties visible when accessed from the parent and the grandparent.
Run the following command and restart RpsSync services to create the Site2 node:
New-RpsNode -NodeId <id_of_site2> -Name Site2 -SyncEndpointUrl <sync_endpoint_url_of_site2> -CertificateThumbprint <certificate_thumbprint_of_site2> -Hostname APP-S2.region.rps -IpAddress <ip_address_of_site2> -ParentNodeId <id_of_app.region>- Restart the RpsSync service on both machines (APP.Region and APP-S2.region):
- Windows Key + R
- Services.msc
- Find RpsSync, right-click on it, and select Restart
On APP.region, after the sync service has restarted
- Windows Key + R
- iexplore https://app.region.rps:8080/
- Targeting > Nodes
- Find the Region node and click on it
- Make sure that the Site2 node is listed as a Child Node
- Dashboard > Sync
- Check for any sync errors to make sure it’s synchronizing properly
On APP-S2.region, after the sync service has restarted
- Windows Key + R
- iexplore https://app-s2.region.rps:8080/
- Targeting > Nodes
- Find the Region node and click on it
- Make sure that the Site2 node is listed as a Child Node
- Dashboard > Sync
- Check for any sync errors to make sure it’s synchronizing properly
- Resourcing > Resources
- Add Resource > Resource
Fill out the form with any information and click on the Save button
Restart the RpsSync service on both machines (APP.Region and APP-S2.region)
Check that your new Resource appears on both machines (you may need to give sync a few minutes). Do the following on each machine to check:
- Windows Key + R
- iexplore https://app.region.rps:8080/
- Resourcing > Resources
- Look for your new Resource