How to Patch using RPS
This document describes the Patching process of the Rapid Provisioning System (RPS).
Prerequisites
For the Content Delivery Network to transfer content between nodes will will need to know which protocol to use between nodes. (Bits or DFSR). To configure this setting, on each local node we will need to create two new properties.
- ParentCdnProtocol
- The value will be either 'Dfsr' or 'Bits'. This is the connection Rps will use when communicating with its parent.
- ChildCdnProtocol
- The value will be either 'Dfsr' or 'Bits'. This is the connection Rps will use when communicating with all of it's children. You can not configure each child differently.
Known Limitations
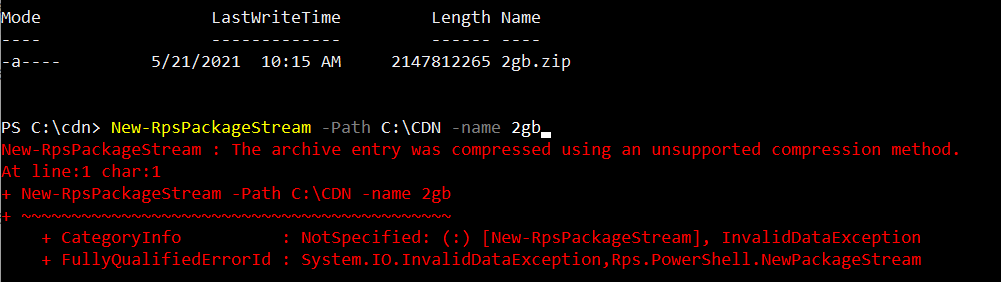
The maximum supported RPS Patch size is 2GB. Any RPS Patch zip file that is larger than 2GB will throw an exception when RPS tries to open the patch and read the manifest file from the patch zip file.
This exception can occur in two scenarios:
- When creating a new Package Stream with a package where the zip file size is greater than 2GB.
- When adding a new patch to an existing Package Stream where the patch zip file size is greater than 2GB.
The resulting behavior:
How to Patch using RPS
RPS Patching feature all users to deploy patches and new software through the RPS system. This section will provide the information on supported patch types, support operating systems, and instructions on using RPS to patch.
Supported Patch Types:
The following are a list of valid patch types that can be applied using RPS:
MSU (Windows)
EXE (Windows)
MSI (Windows)
CAB (Windows)
RPM (Linux)
Script Framework (PowerShell)
Supported Operating Systems:
RPS supports the following operating systems and versions:
Windows 10
Windows Server 2012 (or newer)
CentOS Linux 5 (or newer)
Red Hat Linux 5 (or newer)
Appliances using PowerShell.
How to Patch Windows or Linux
Note
For a Package Stream to deploy the target(s) must be in a valid maintenance window.
(optional) Create Maintenance Window(s) for the Targets that you want to patch (see external document for instructions on how to create a Maintenance Window)
Create the Package file
Create the Package.RPS manifest (see external document for instructions on how to create a Package Manifest)
- The manifest will contain information that describes the patch, including supported OsType, OsVersion, and Architecture which will be used when assignments are made automatically between the Packages and Targets.
Create a zip file that contains the Package.RPS, the installer file (e.g. msu, exe, msi, rpm, cab, Powershell, etc.), and any other supporting files needed by the installer.
- The manifest and the main installer file should in the root of the zip archive
Place all the Package files in a single directory (there should be a single directory for each Package Stream)
Copy the Package files to the Node. You can use an external media device to do this, such as a thumb drive to copy the files to the Node.
Create the Package Stream for the Package files (see external document for instructions on how to create a Package Stream)
Approve the Package Stream (see external document for instructions on how to approve a Package Stream)
How to Patch an Appliance
Create a Target type that is 'patchable' and properties for the appliance. see: How to Create a Patchable Target Type
Create the Package zip file that contains:
The actual patch installer/executable for the appliance
The manifest. Create this by following the external documentation on how to create a package manifest.
The manifest for the appliance patch needs to have the following information:
OsType - ESX (this should match the OsType of the Target Item property)
Architecture - * (this can be a wildcard to match any architecture or a specific architecture such as x86)
The PowerShell script that will perform the work to run the installer/executable to patch the appliance. This can be any script as needed but if it has parameters then you can add these as additional properties to the Target Item that was created in step #3. For more information on the Script Framework see: Packaging Script Framework
Place the Package file(s) in a single directory (there should be a single directory for each Package Stream)
Copy the Package file(s) to the Node. You can use an external media device to do this, such as a thumb drive to copy the files to the Node.
Create the Package Stream for the Package file(s) (see external document for instructions on how to create a Package Stream)
Approve the Package Stream (see external document for instructions on how to approve a Package Stream)